Starting and Stopping Smoothly
“Power Pedal” starting technique.
At CyclingSavvy we teach communication with other road users. But there’s a part of the course called “Train Your Bike.”
Cute catchphrase? Well, sort of. You are actually training yourself, but “training the bike” is how it feels. We want you to feel at one with your bike.
Many riders never learn to be one with their bike when they are starting and stopping.
It sounds so basic. Why spend time on it? How could people possibly screw up starting and stopping enough for that to be a problem?
Well, they can and it is.
Lowering the stress level
CyclingSavvy founder Keri Caffrey once had a student who was a super-experienced athlete. The student had completed a half-Ironman triathlon. But for her, starting and stopping were near-crashing events. She wobbled scarily at slow speed — and slow speed is part and parcel of every start and stop. Keri’s instruction lowered that student’s stress level enormously.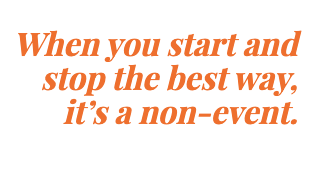
You don’t have to be a serious triathlete to need this instruction. Look around at other cyclists, and you’ll see:
- People don’t stop at stop lights because their stop/start skills are so poor. (Double that when an unskilled rider gets a pedal-binding system.)
- If someone does stop, it’s disturbing to watch, and so are the first 30 feet after restarting.
- Just as you come to a stop sign, there is a gap in the cross traffic. Is it long enough? That might depend on your being ready for a quick restart.
- Category IV (novice) mass-start road race starts are scary. People don’t accelerate smoothly away from the starting line.
The solution is right here!
This can be fixed. Easily. But you have to know how.
If you follow all the steps in sequence, every start is smooth. Every stop is smooth. None of these steps is difficult. None requires fancy bike-handling skill. But you have to know them and understand them.
This is exactly what we teach in Train Your Bike.
It looks so easy. Because when you start and stop the best way, it’s a non-event.
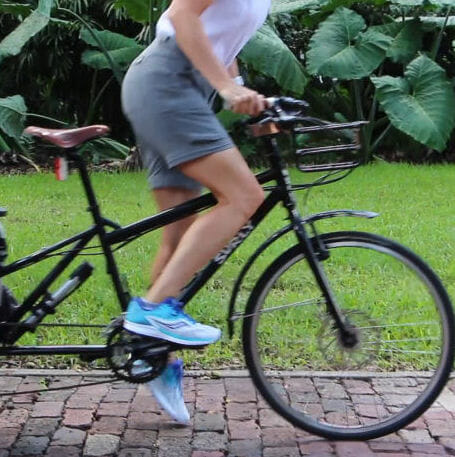
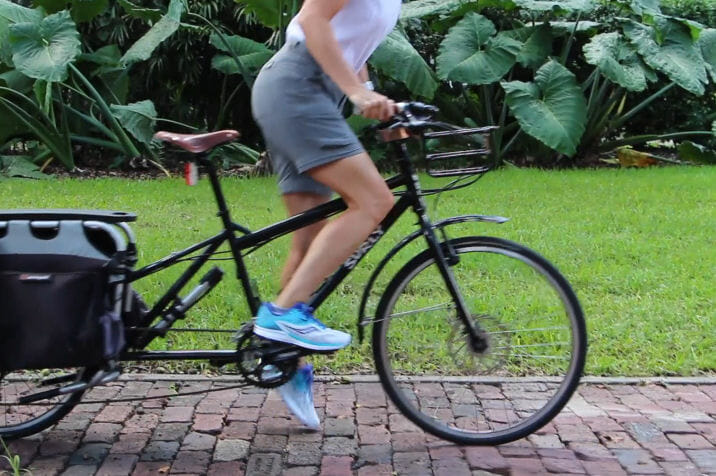
To start, you lift a pedal to the power position while straddling the bike, with your butt in front of the saddle. Stand on the one pedal, lift your butt up and slide it rearward. Put your other foot on the other pedal and continue pedaling.
To stop, use the brakes to stop the bike, slide your butt forward off the saddle and put your weight on one foot. Lean the bicycle toward the other foot — so it is outboard of the pedal. Put that foot on the ground just as the bike stops. You use that foot and your hands to hold the bike while it’s stopped. And you use the other foot to lift a pedal into the power position for your next start.
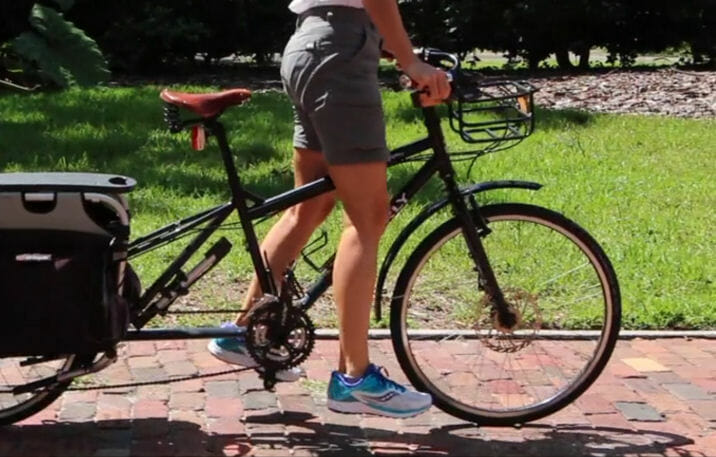
Putting a foot down for a landing
We love teaching starting and stopping — and other skills — because we love to see both novices and experienced riders discover entirely different and better ways to do things on their bikes.
Try practicing this skill. Watch the video a few times. Then follow up with practice, so the sequence unfolds smoothly. It takes practice, as the saying goes, to get to Carnegie Hall.
Starting and stopping is only one of the several essential bike-handling techniques covered in the CyclingSavvy Train Your Bike session. The video is included in our free online Essentials course, and the steps are covered in our Bicycling Street Smarts booklet, also available as an Amazon Kindle e-book.


I noticed this as a CANBike instructor. I figured a potential cause:
In North America, most kids’ bikes used to have coaster brakes, and thus it wasn’t possible to back-pedal to get the “prime” foot in the power position. So riders could only start by pushing against the ground with the other foot, until they had gained some momentum, by which time the “prime” foot would be just about anywhere but the power position …. and thus it would be sheer chance when effective pedalling could start.
I like the “start against the brake” technique. Gonna have to check what I do ….
I stop with my prime foot in the power position, landing on the other foot, so I’m immediately ready to re-start.
Peter James — yes, it is possible to stop with a foot in power pedal position if you brake hard enough to prevent it from rolling the bicycle forward. This requires precise timing to apply the brakes hard just as the bicycle stops, planting the landing foot on the ground before the bicycle falls over.
But also, correct, most children start out with the saddle low so both feet can be flat on the ground when sitting on the saddle. Many people never overcome the habit of staying on the saddle when stopped.
It is possible to start in power pedal position with a coaster brake, though this requires relearning. The braking foot is at the rear. If the best angle to start backpedaling is chosen, the other pedal will be in the power pedal position. But the rider must place the braking foot on the ground and then lift the other foot to its pedal. This is slower and more complicated than stopping and restarting a bicycle with dual handbrakes.
Lifting off the braking foot releases the coaster brake, so the bicycle should also have a handbrake to keep it from rolling when stopped on a slope. Also, every brake will fail sooner or later: a coaster brake most commonly when the chain comes off; a handbrake, when the cable frays and snaps. You want to have another brake in reserve when this happens!
Good stuff!
It should be noted the “power position” (power pedal position), is usually at 2 o’ clock.
Also for heavier e-Bikes and without low-step top tubes, you can lean the bike to the side you’re dismounting to make it easier — but be careful due to the heavier weight of the e-Bike!
ALSO VERY important for e-Bikes is to turn off the “power” to the motor BEFORE dismounting, so “lurking” does not occur!
Enjoy your ride,
CS⚡
Retired Bike Cop
CA POST Bike Patrol Instructor
E-Bike Presenter & Instructor