Filtering Forward Past a Traffic Jam

Filtering forward in a traffic jam
Bicyclists often can keep moving when motorists are stuck in a traffic jam — but need to exercise extreme caution when filtering forward.

Traffic congestion on urban streets is a fact of life, and no bicyclist wants to be stuck in it, breathing exhaust. Fortunately, a bicyclist can usually manage to avoid being stuck. If you ride in the same area for a long time, you develop a repertory of alternate routes. You might duck into an alley or take a shortcut through a park. You might use the sidewalk — with caution. 

Many cyclists are unaware of the risks, or fatalistic, and take any option available. Savvy cyclists understand risks, avoid them and apply what might be described as a code of honor:

  • Respect pedestrian rules in pedestrian space.
  • Adhere as closely as possible to the rules of movement in driver space. 
  • Don’t make a motorist pass twice in a narrow lane if passing safely is difficult.

Filtering forward through a queue of traffic involves violating the rules of movement. Any time you violate the rules of movement, you increase your risk exposure. That doesn’t mean you should never do it, it just means you need to understand the risks and compensate for them. 

Filtering Forward With Caution

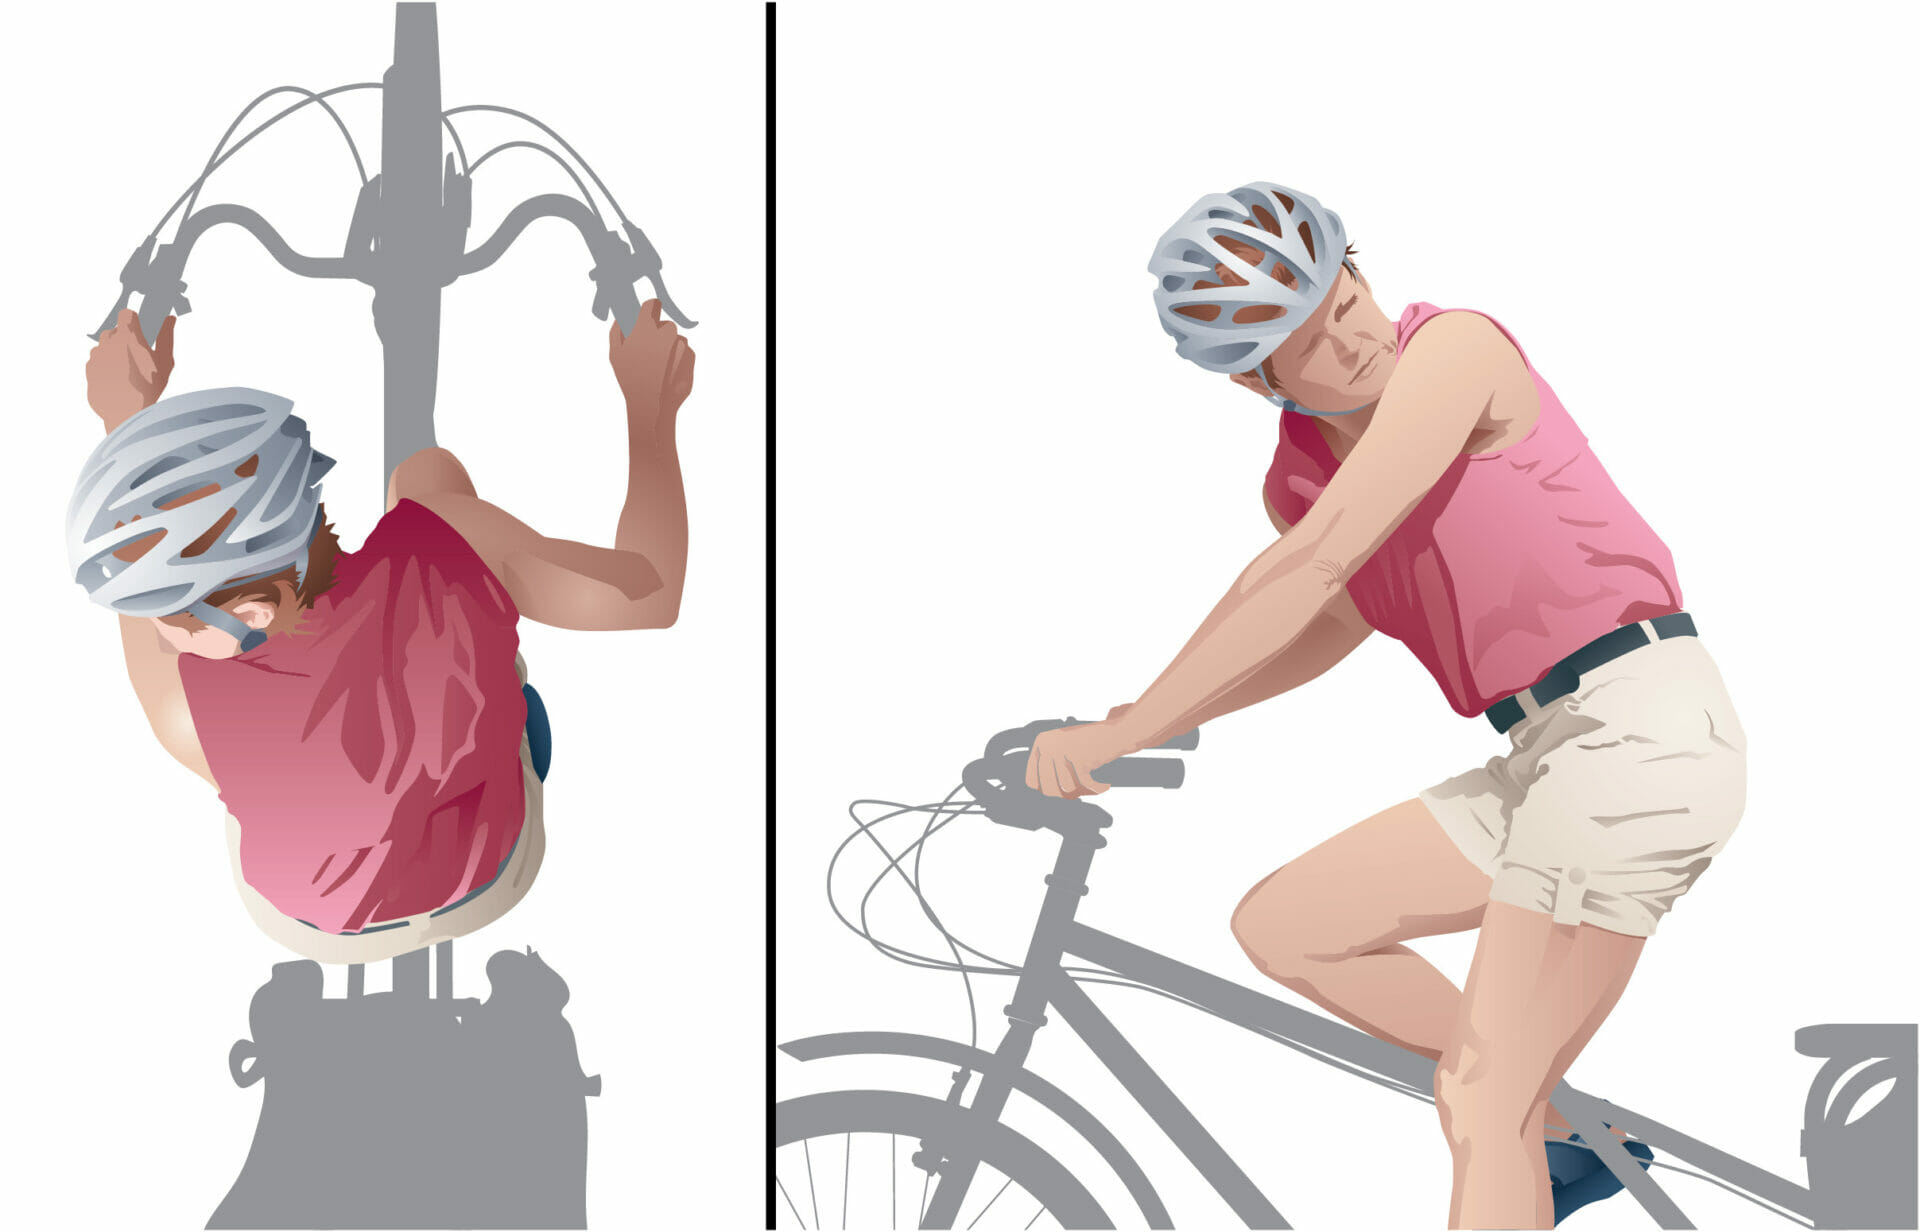
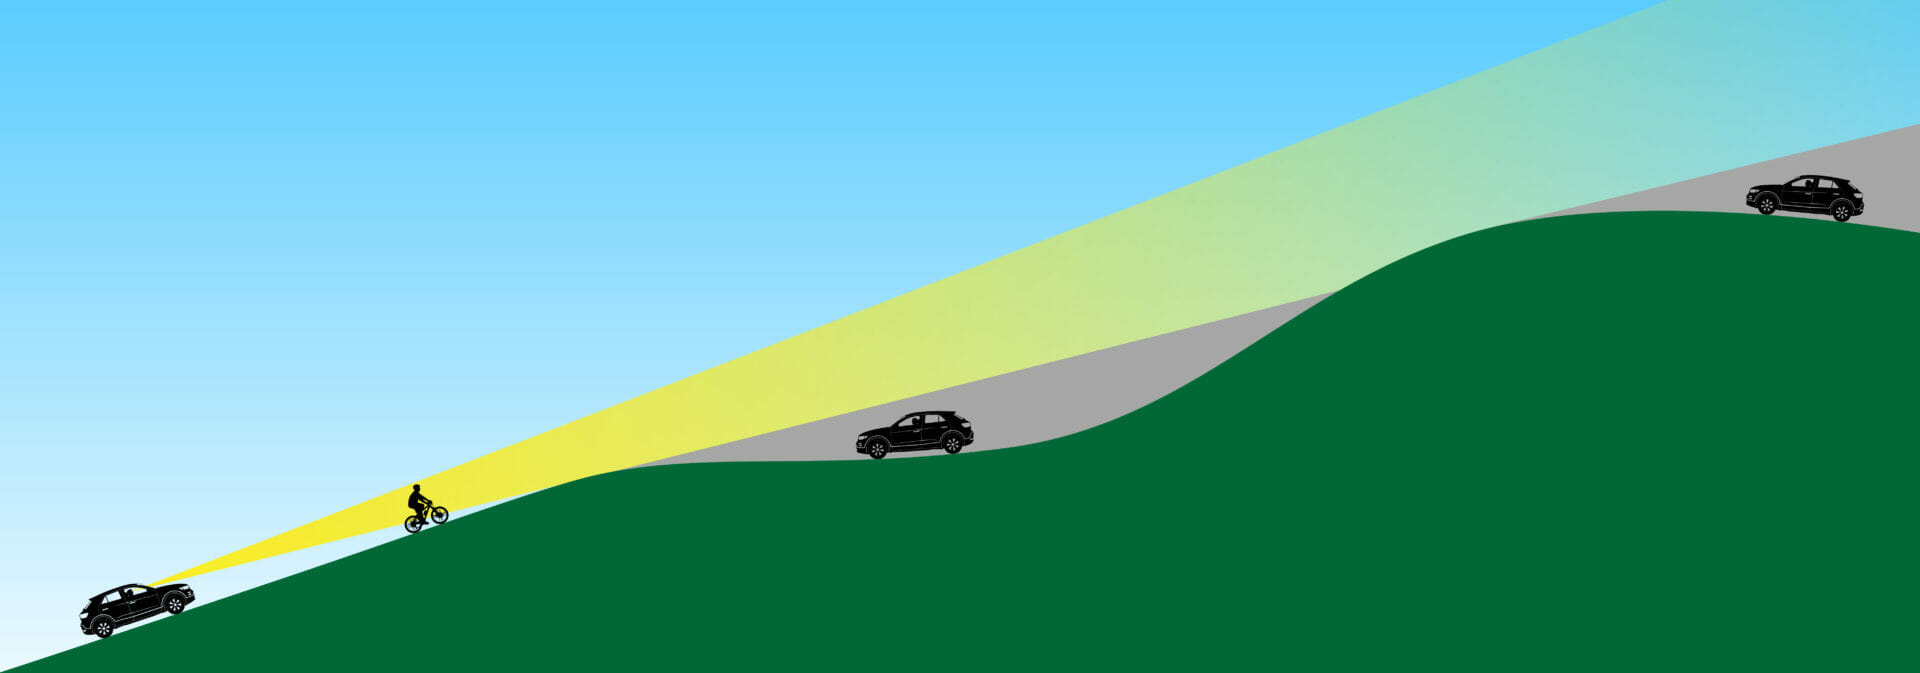
Filtering forward in stopped traffic requires special caution, whether you are in a bike lane, shoulder or riding the edge of a shared lane. While it is legal in all cases, often the obligation to avoid a crash is on you. Passing on the right places you where others don’t expect you and often can’t see you. Sometimes you can’t see them either. So you need to expect them.

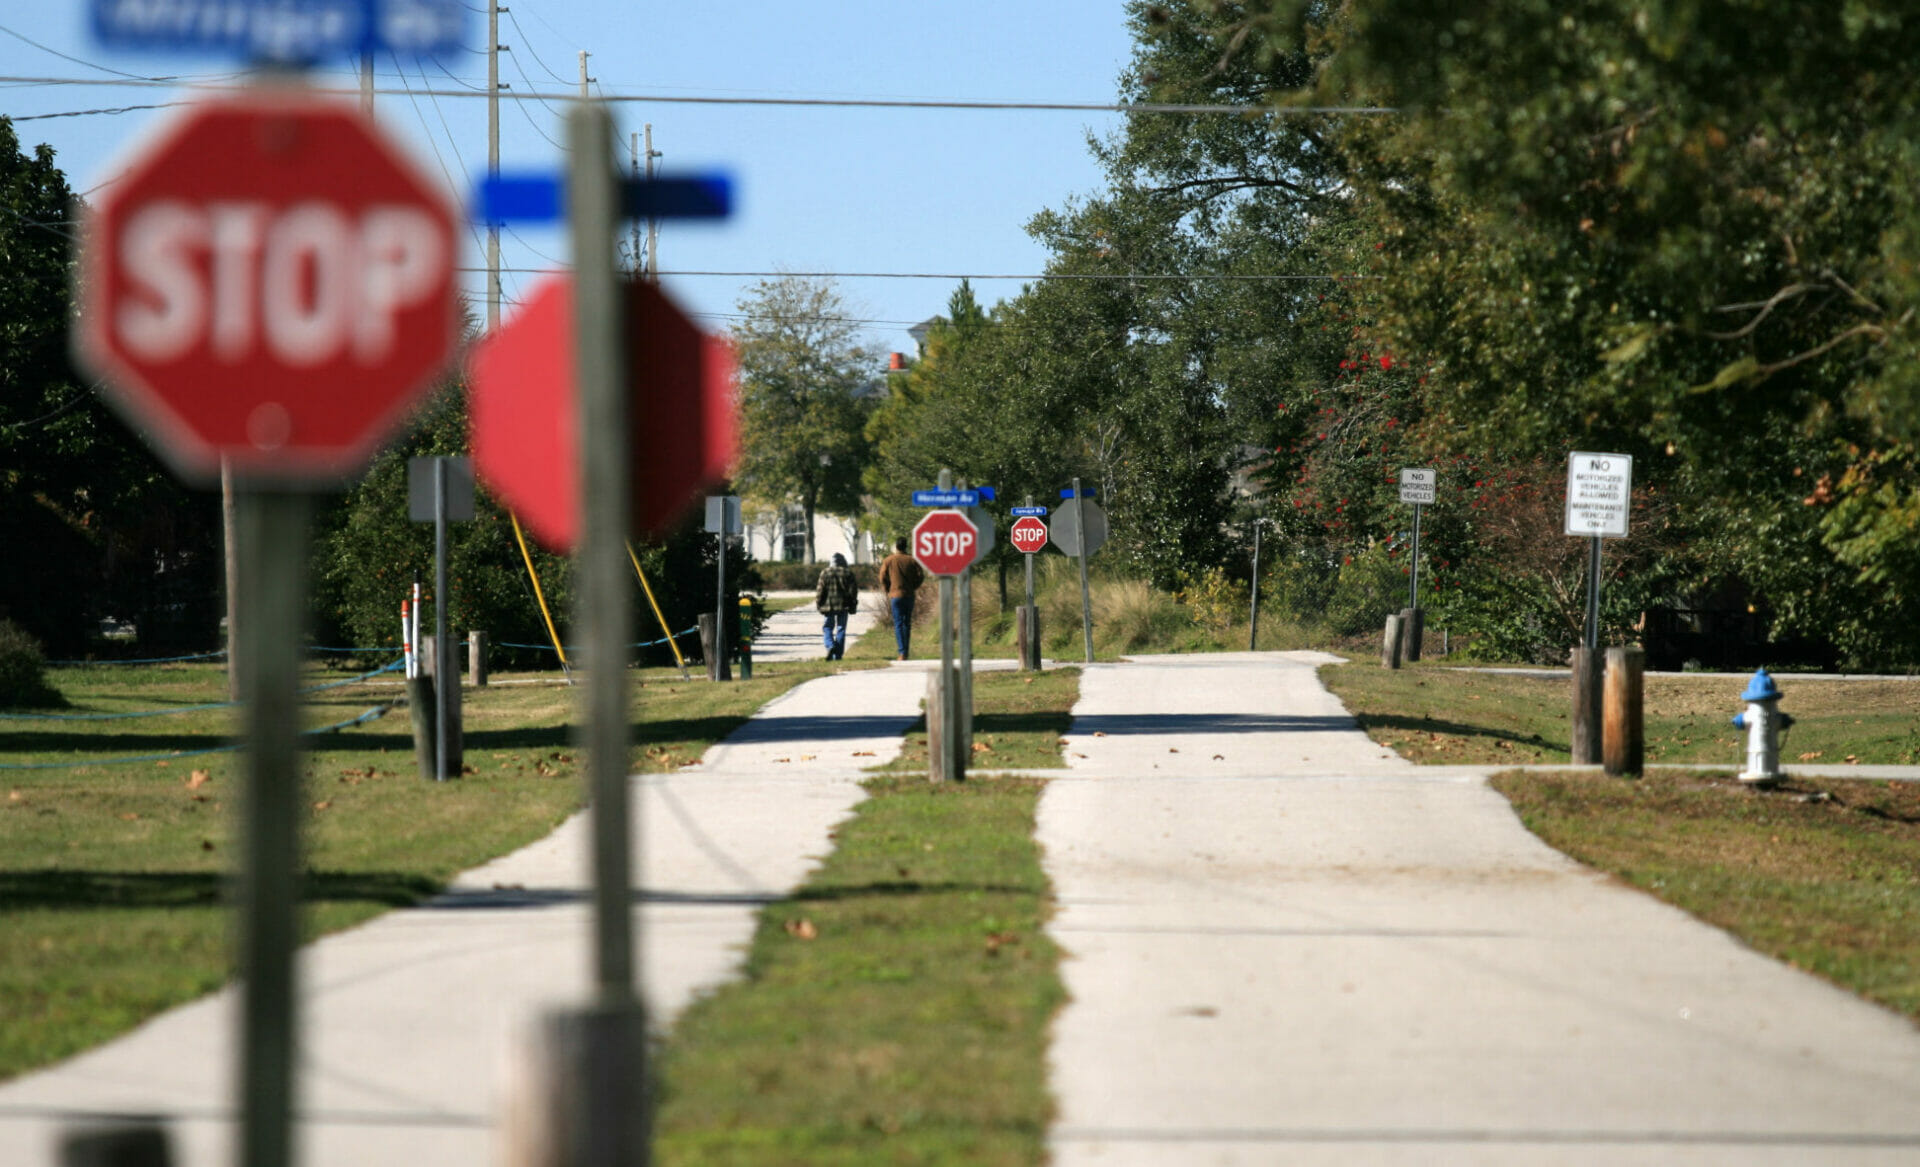
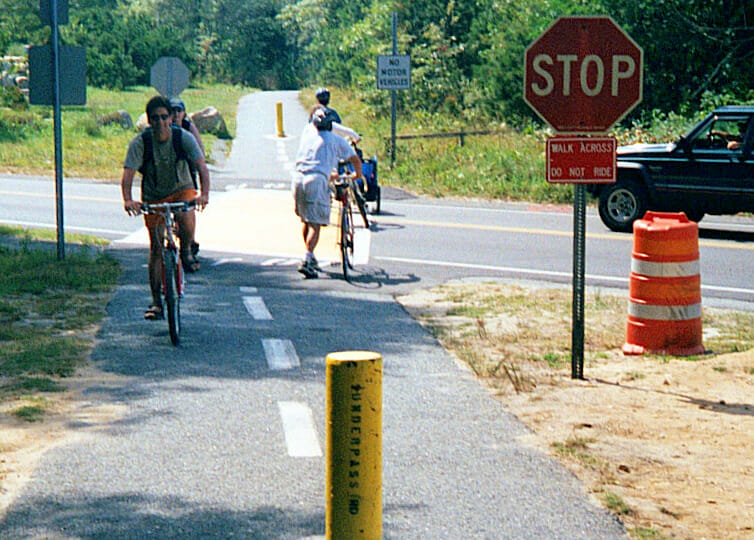
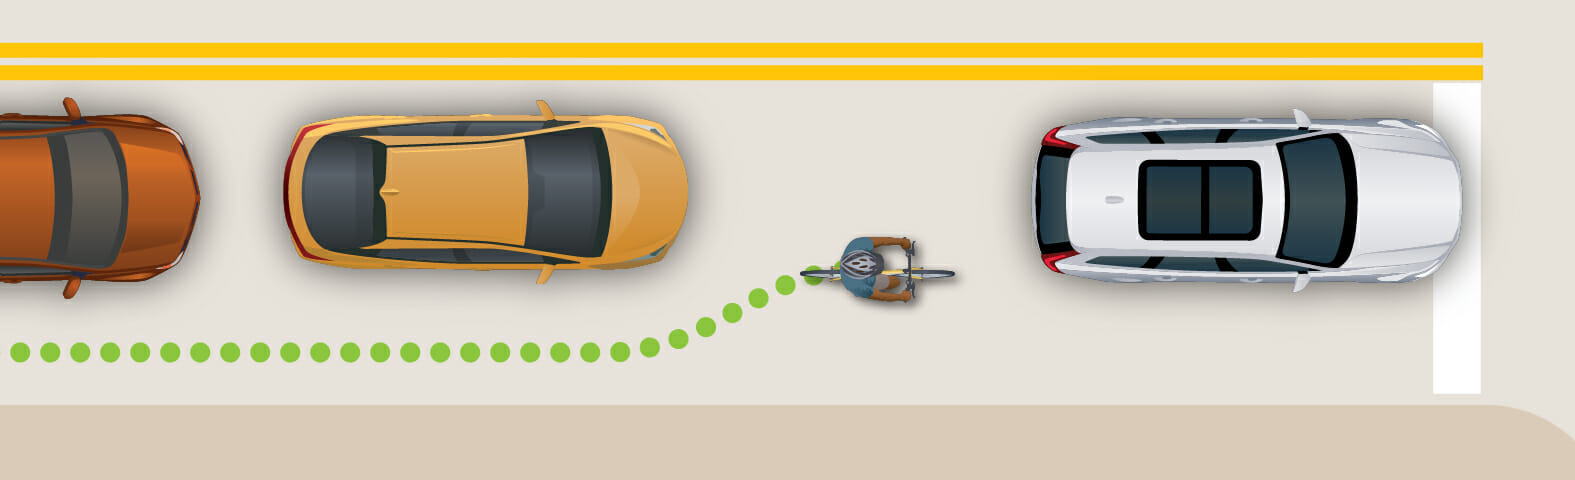
Filtering forward with no bike lane

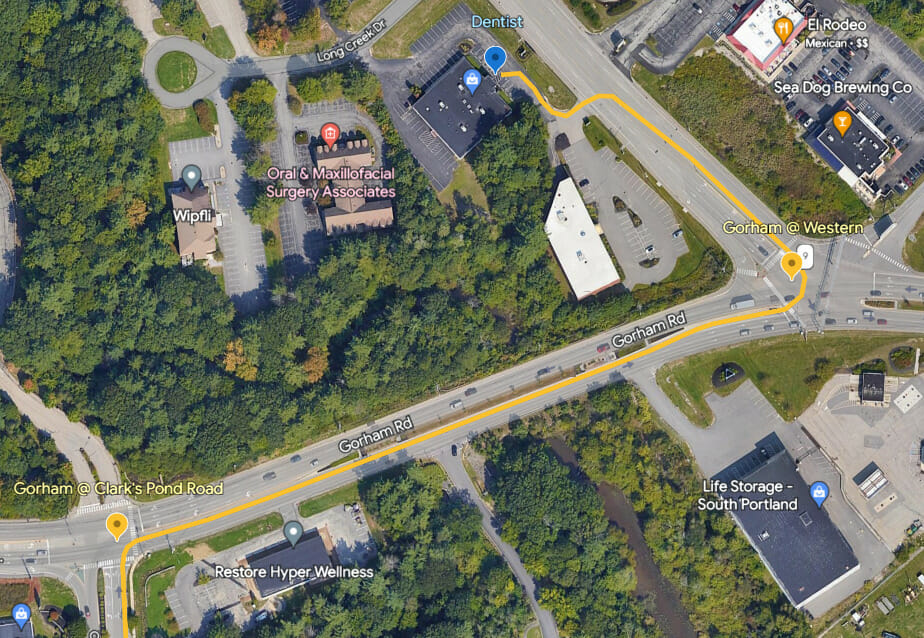
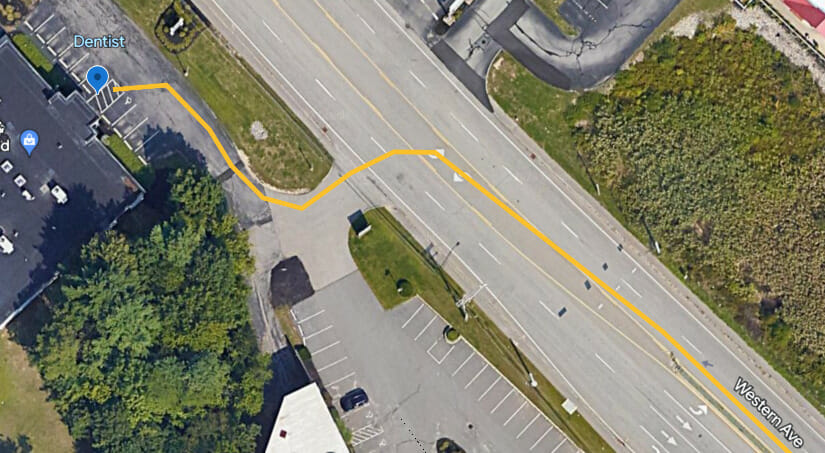
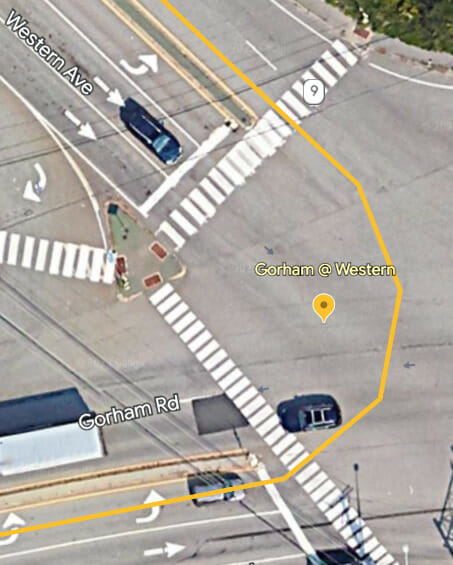
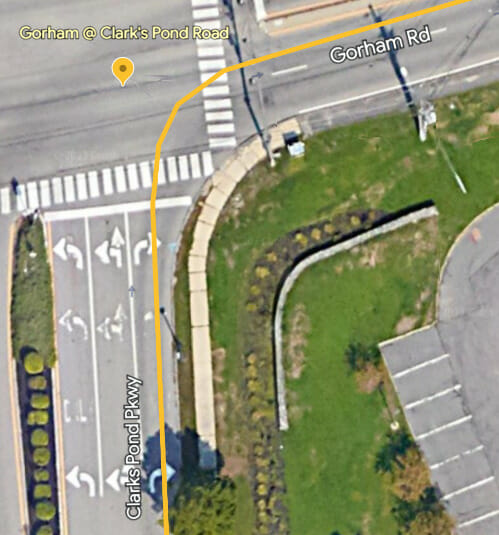
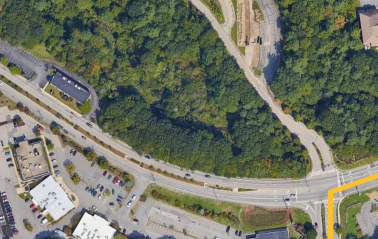
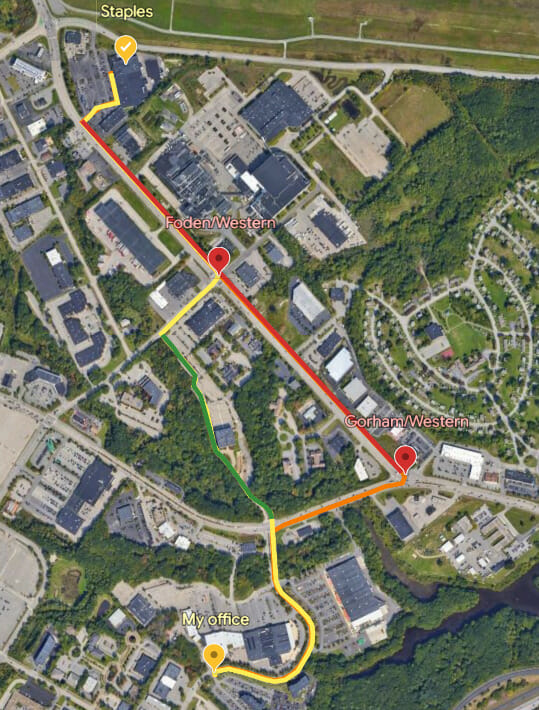
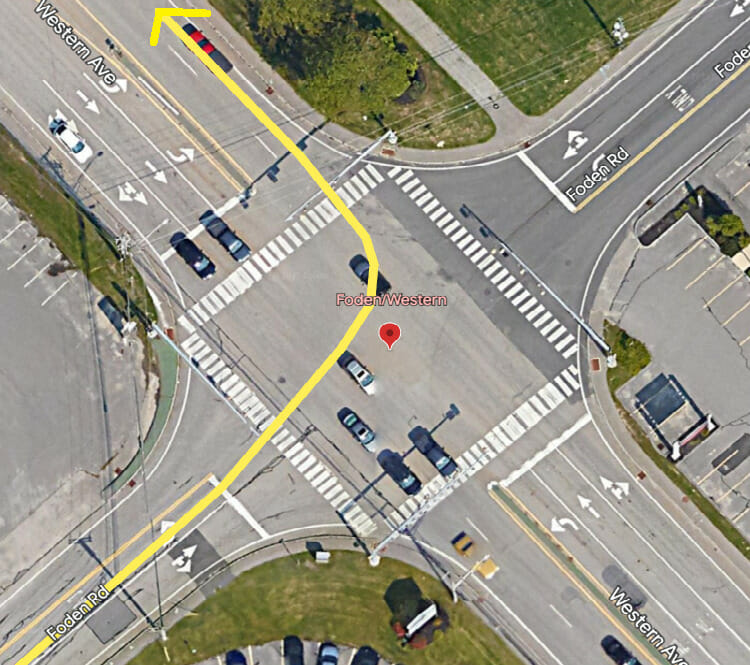
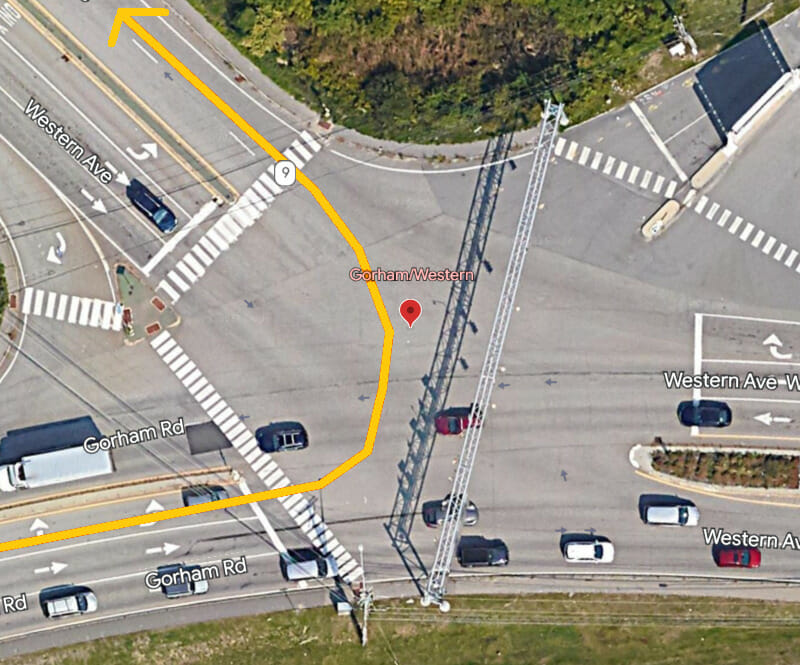
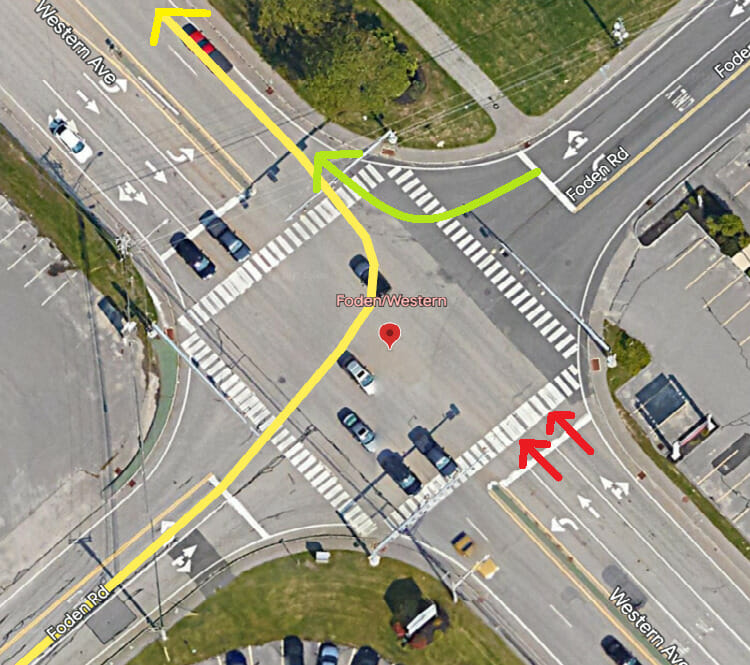
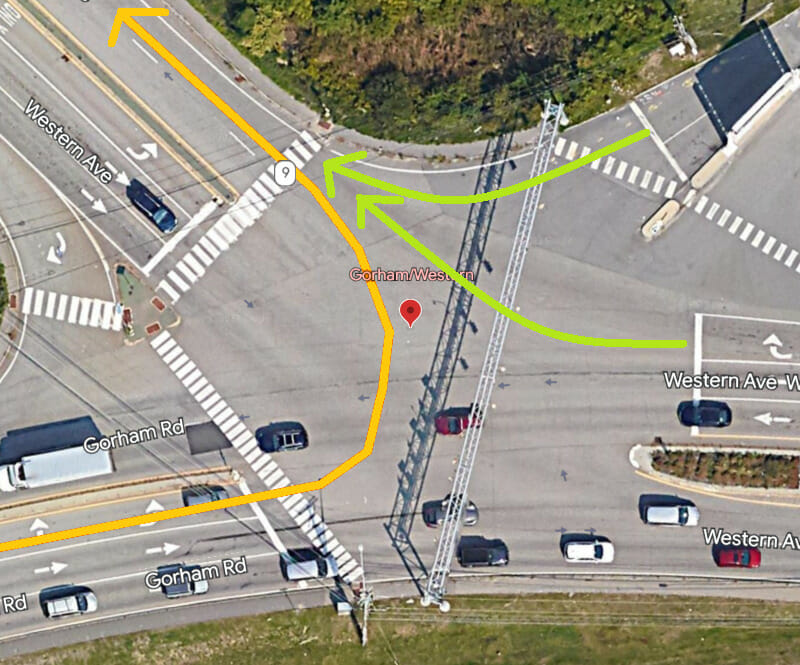
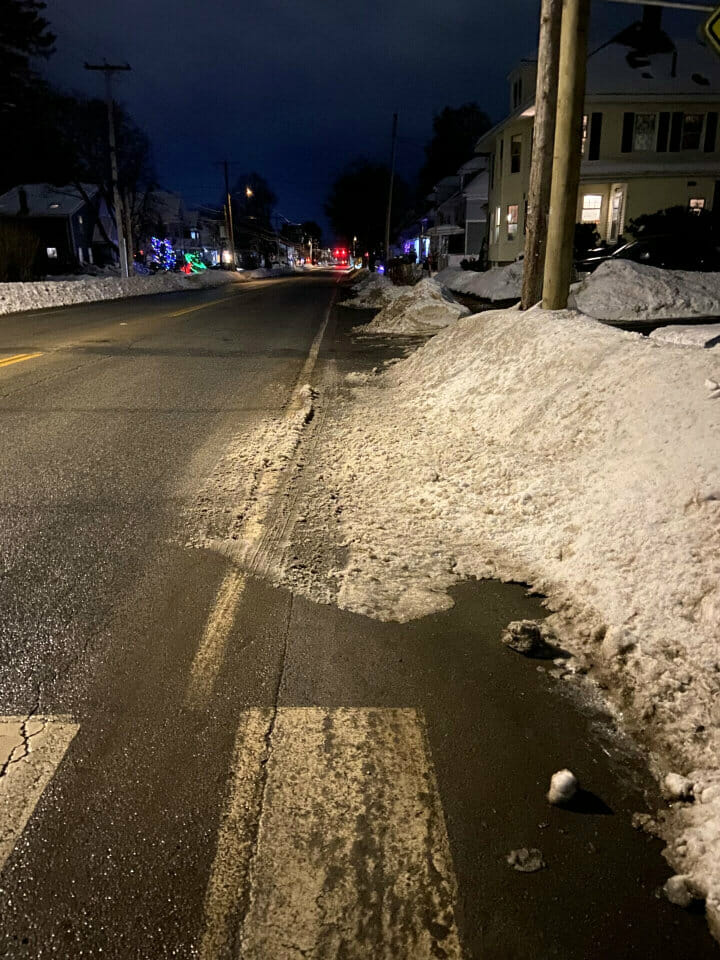
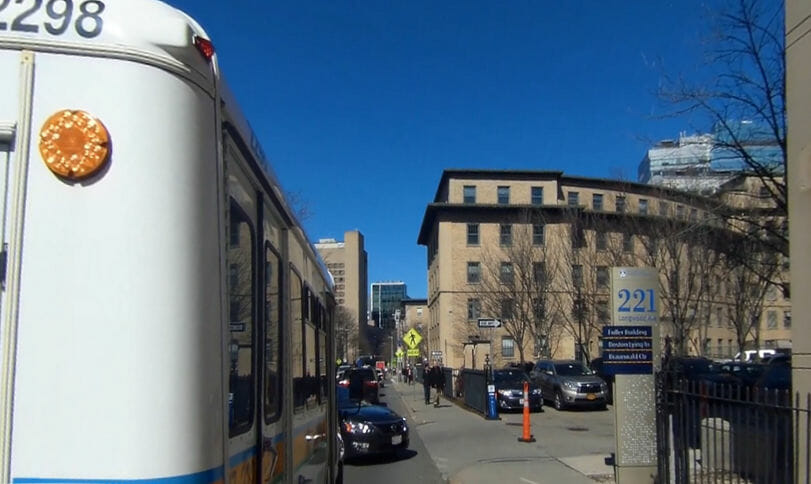
The video embedded above shows how I jumped the queue under highly challenging conditions. I was on a street with just enough room to pass stopped motor vehicles on the right (the location). There was no passing on the left, because the next lane carried opposite-direction traffic. I had to anticipate the many potential hazards. I moved forward cautiously and slowly only when I could avoid them.

What to watch for when filtering forward

Let’s recap what the video shows. Assume here that you are jumping the queue of stopped traffic on the right. (The same hazards are mirrored on the left side of a one-way street.) 

The hazards include:

  • Any vehicle moving forward, even very slowly, can merge or drift toward you. Pass only if the traffic is at a stop and you can tell that it is unable to restart. 
merge risk when filtering forward
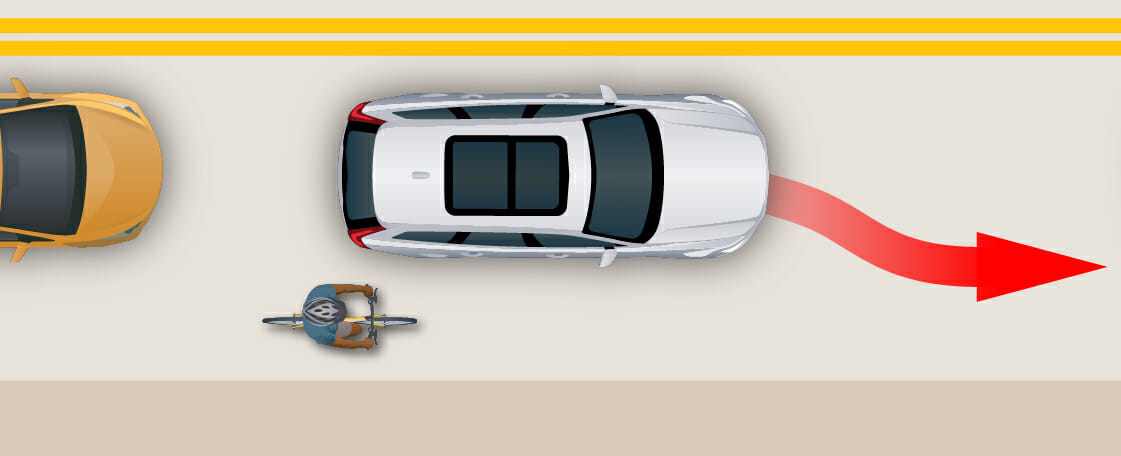
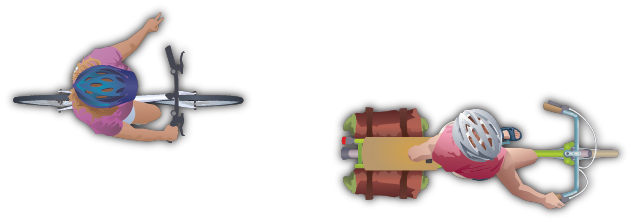
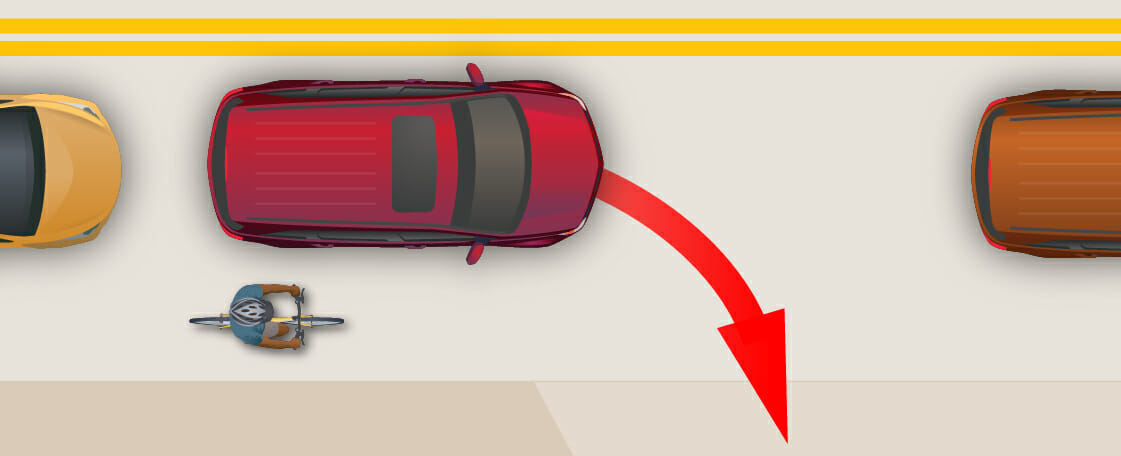
  • A vehicle you are passing on the right can start up, turn right and right-hook you at any entry to a street or driveway. And so my rule is never to pass a vehicle on the right if there is a street or driveway ahead into which it might turn. 
right hook risk when filtering forward
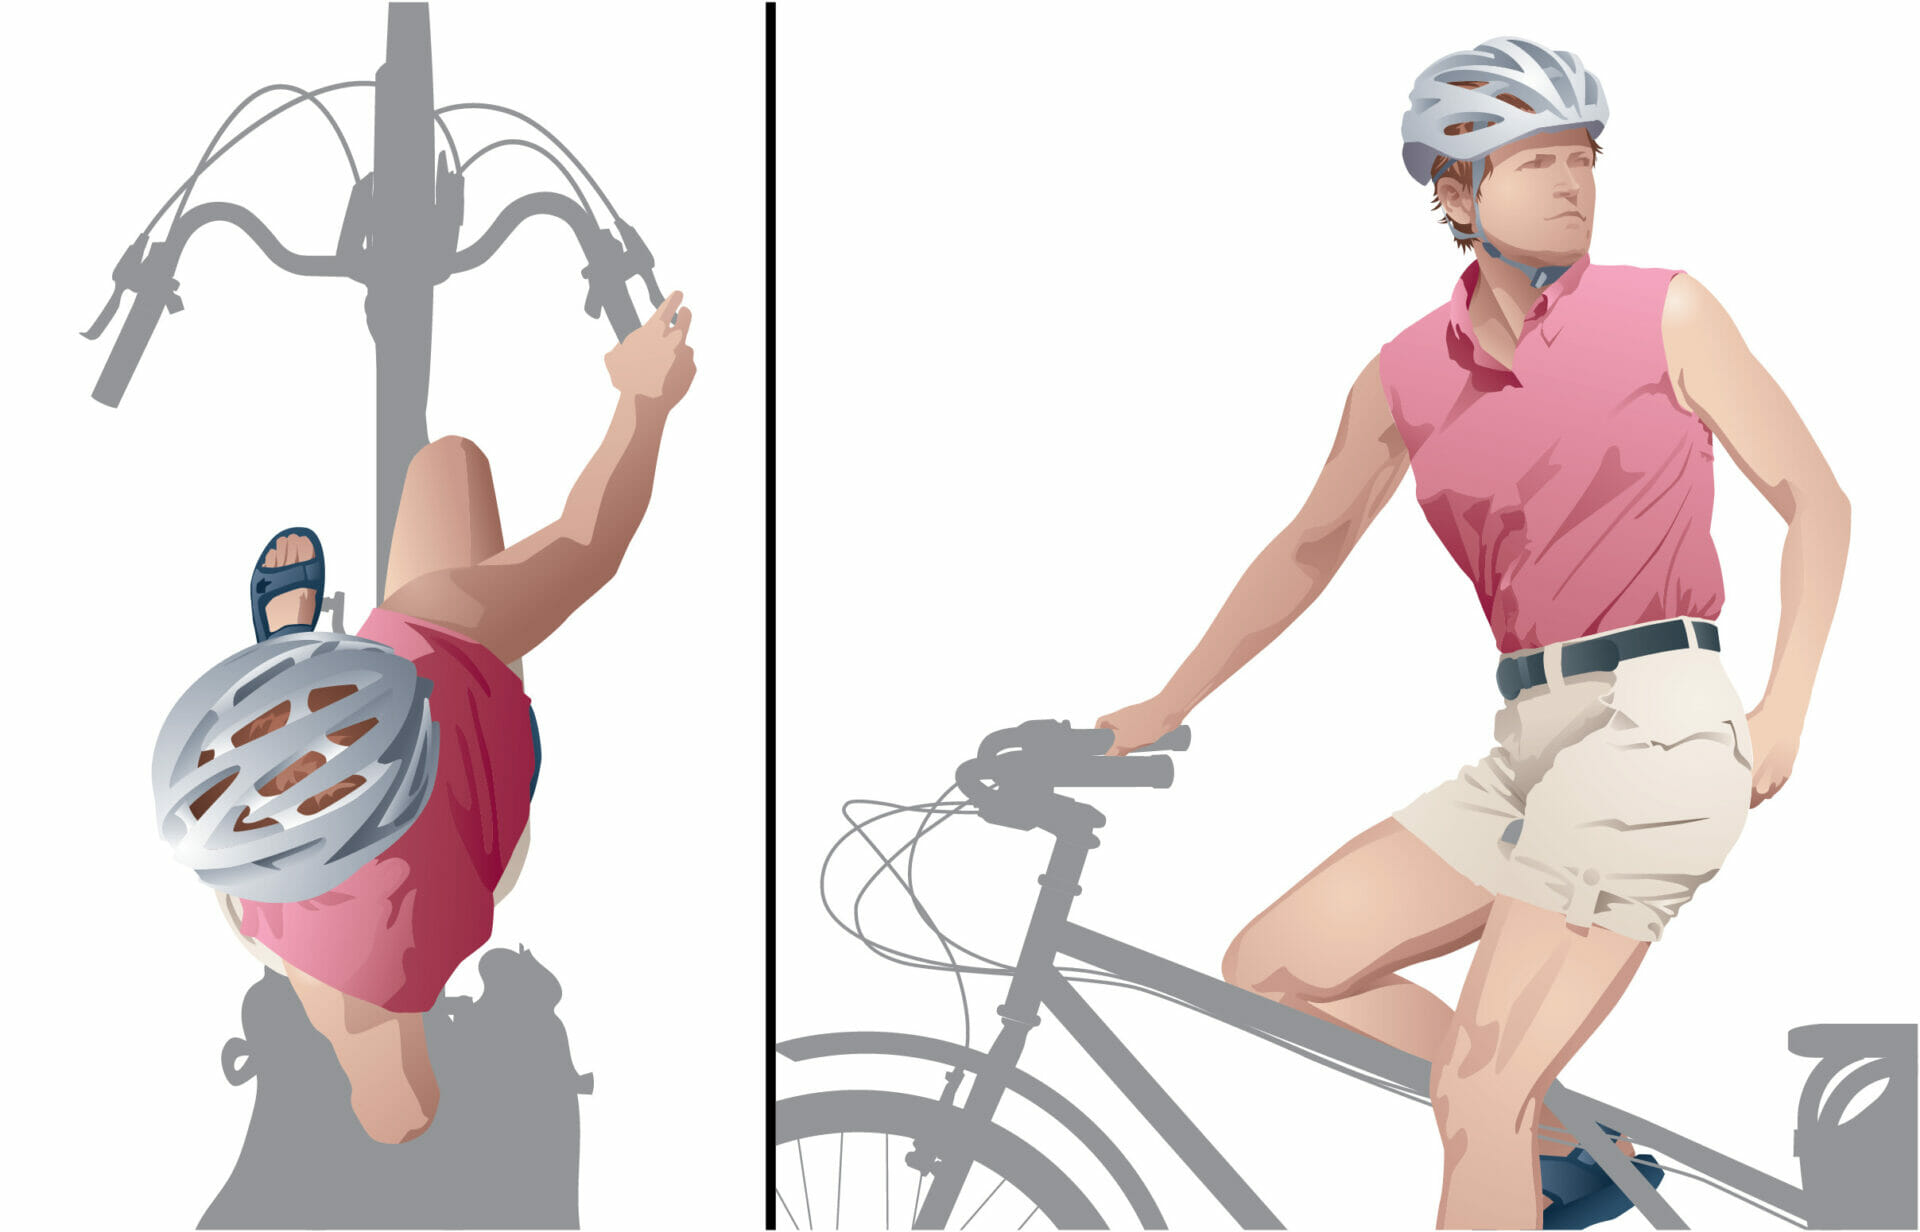
  • Doorings and walk-outs can happen as usual from the curb side, but also from the street side — most common with taxis and other ride-share vehicles, but it can happen with any vehicle.
dooming risk from passenger side when filtering forward
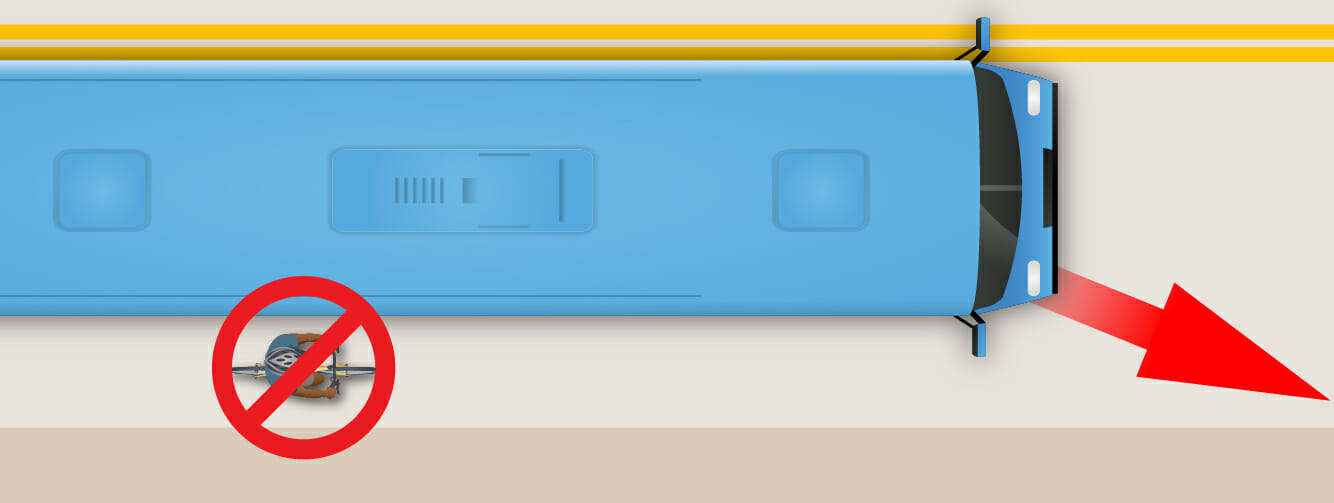
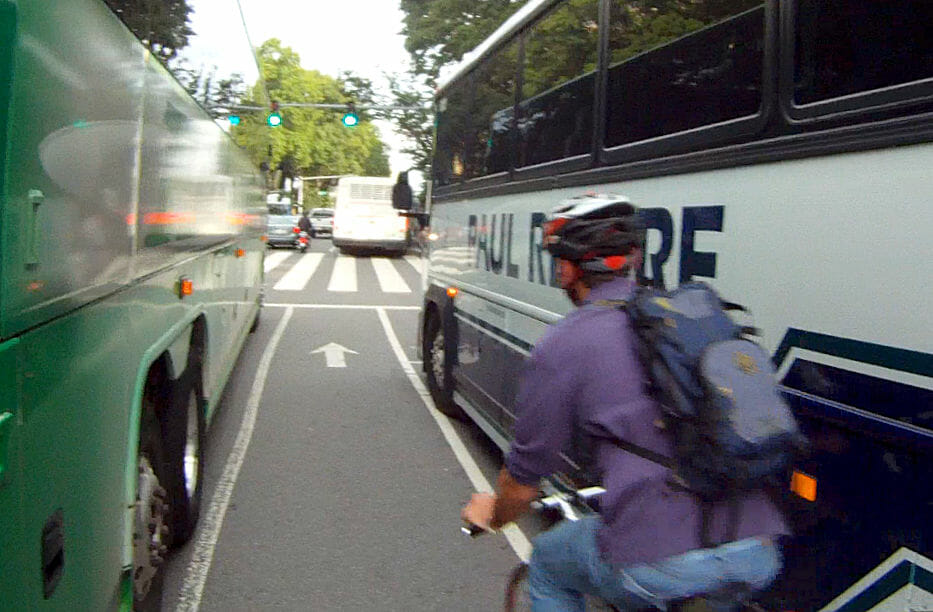
  • Never pass a bus or large truck on the right. It may start to turn or merge while you are passing, trapping you. Off-tracking can sweep you underneath. Buses and trucks often have signs, “if you can’t see my mirrors, I can’t see you.” That does not mean “if you can see my mirrors, I saw you.”
never filter forward past a bus or truck illustration
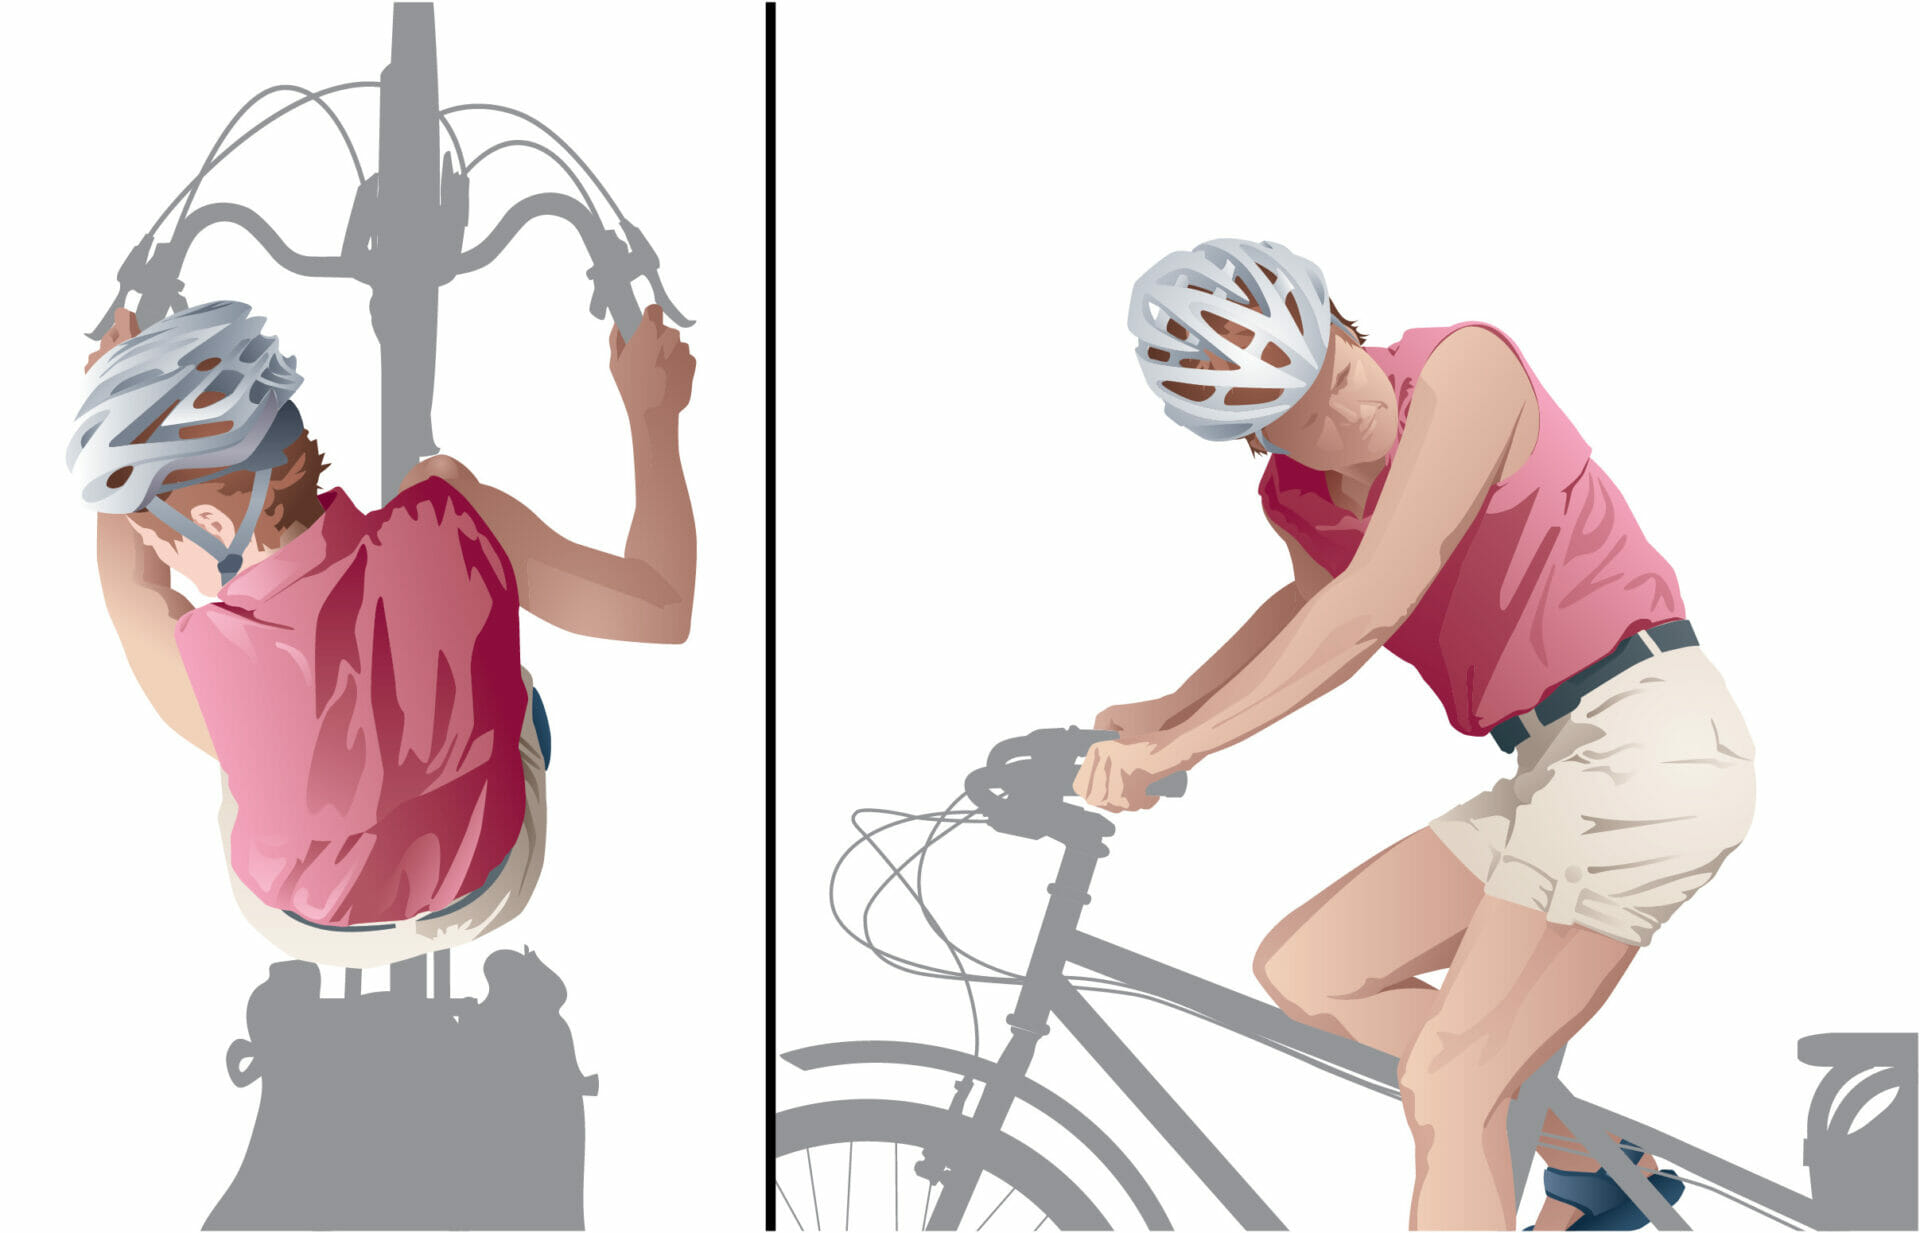
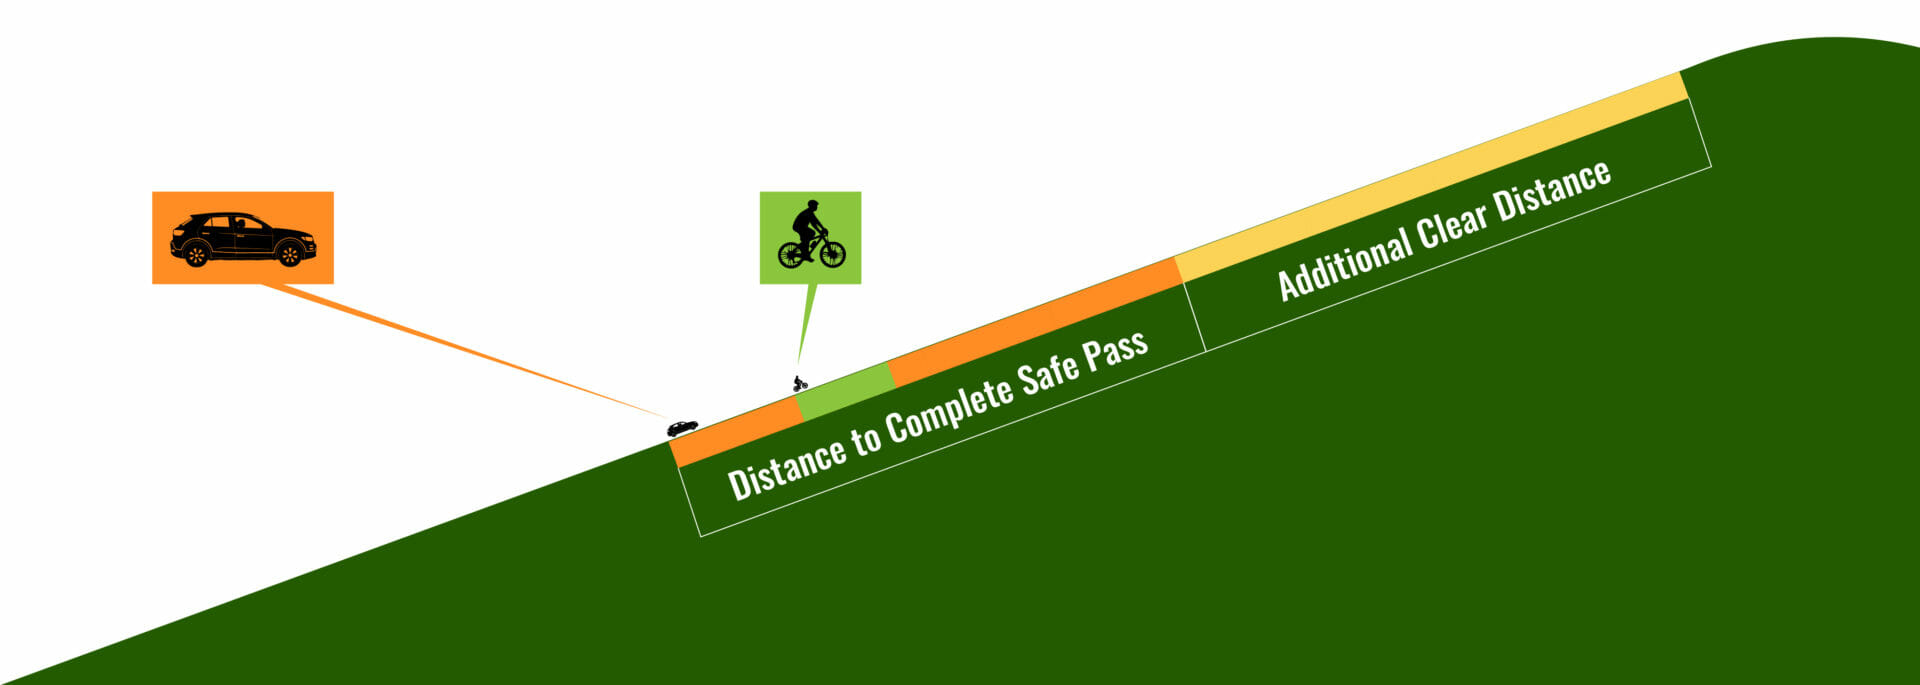
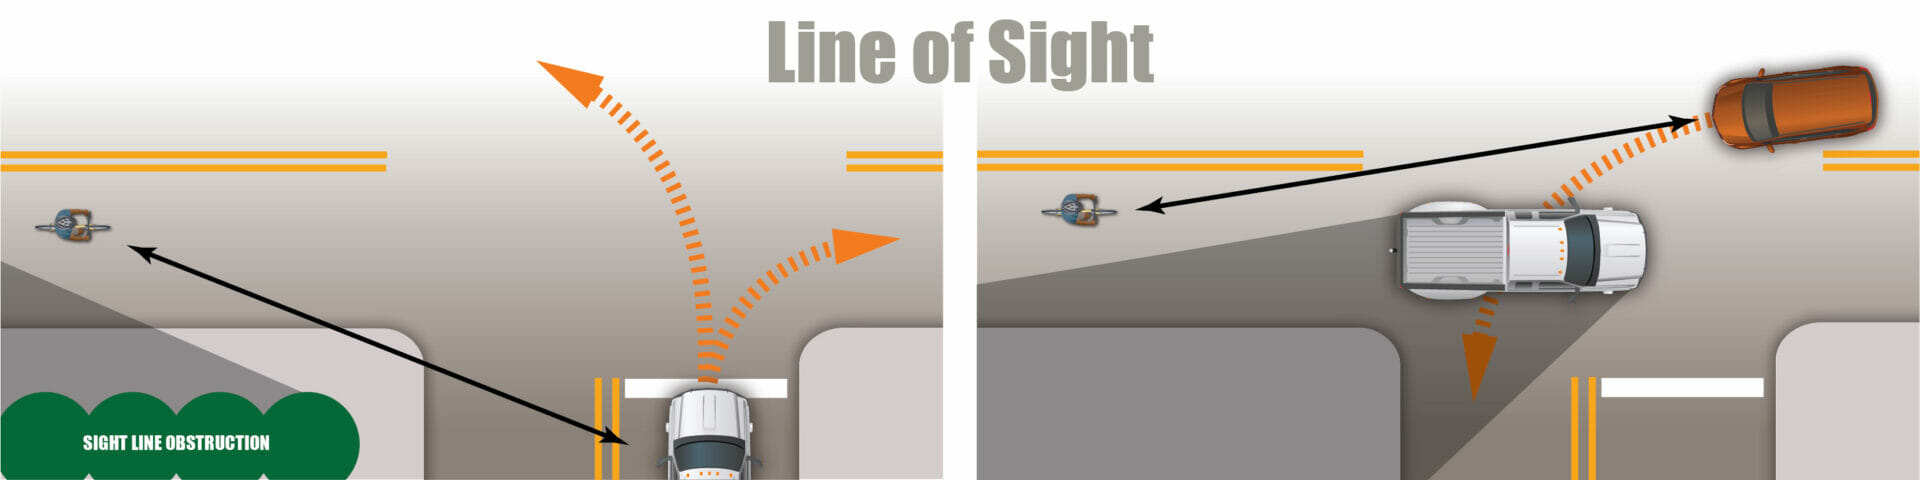
  • Vehicles you are passing hide you from cross traffic — motor vehicles, bicycles, pedestrians. You avoid the risk by slowly and cautiously approaching the front of a vehicle when there is a gap ahead of it, and looking before you proceed. A pedestrian needs only the narrow gap which every driver leaves in a queue.
left cross risk when filtering forward

Avoiding Passing Problems

Buzz pass in queue
Buzz pass in queue

Other bicyclists, and other riders of narrow vehicles, may not be as cautious as you are. They may buzz-pass you on either side, or hook you. You need to keep a straight line, and check for overtaking traffic even in a narrow space.

Tactics for avoiding hazards:

  • Keep your speed slow enough that you can scan thoroughly and stop instantly. Keep your hands on the brake levers.
  • Stop in the gap between vehicles, where the vehicle ahead of you poses no threat and the driver in the next one can see you.
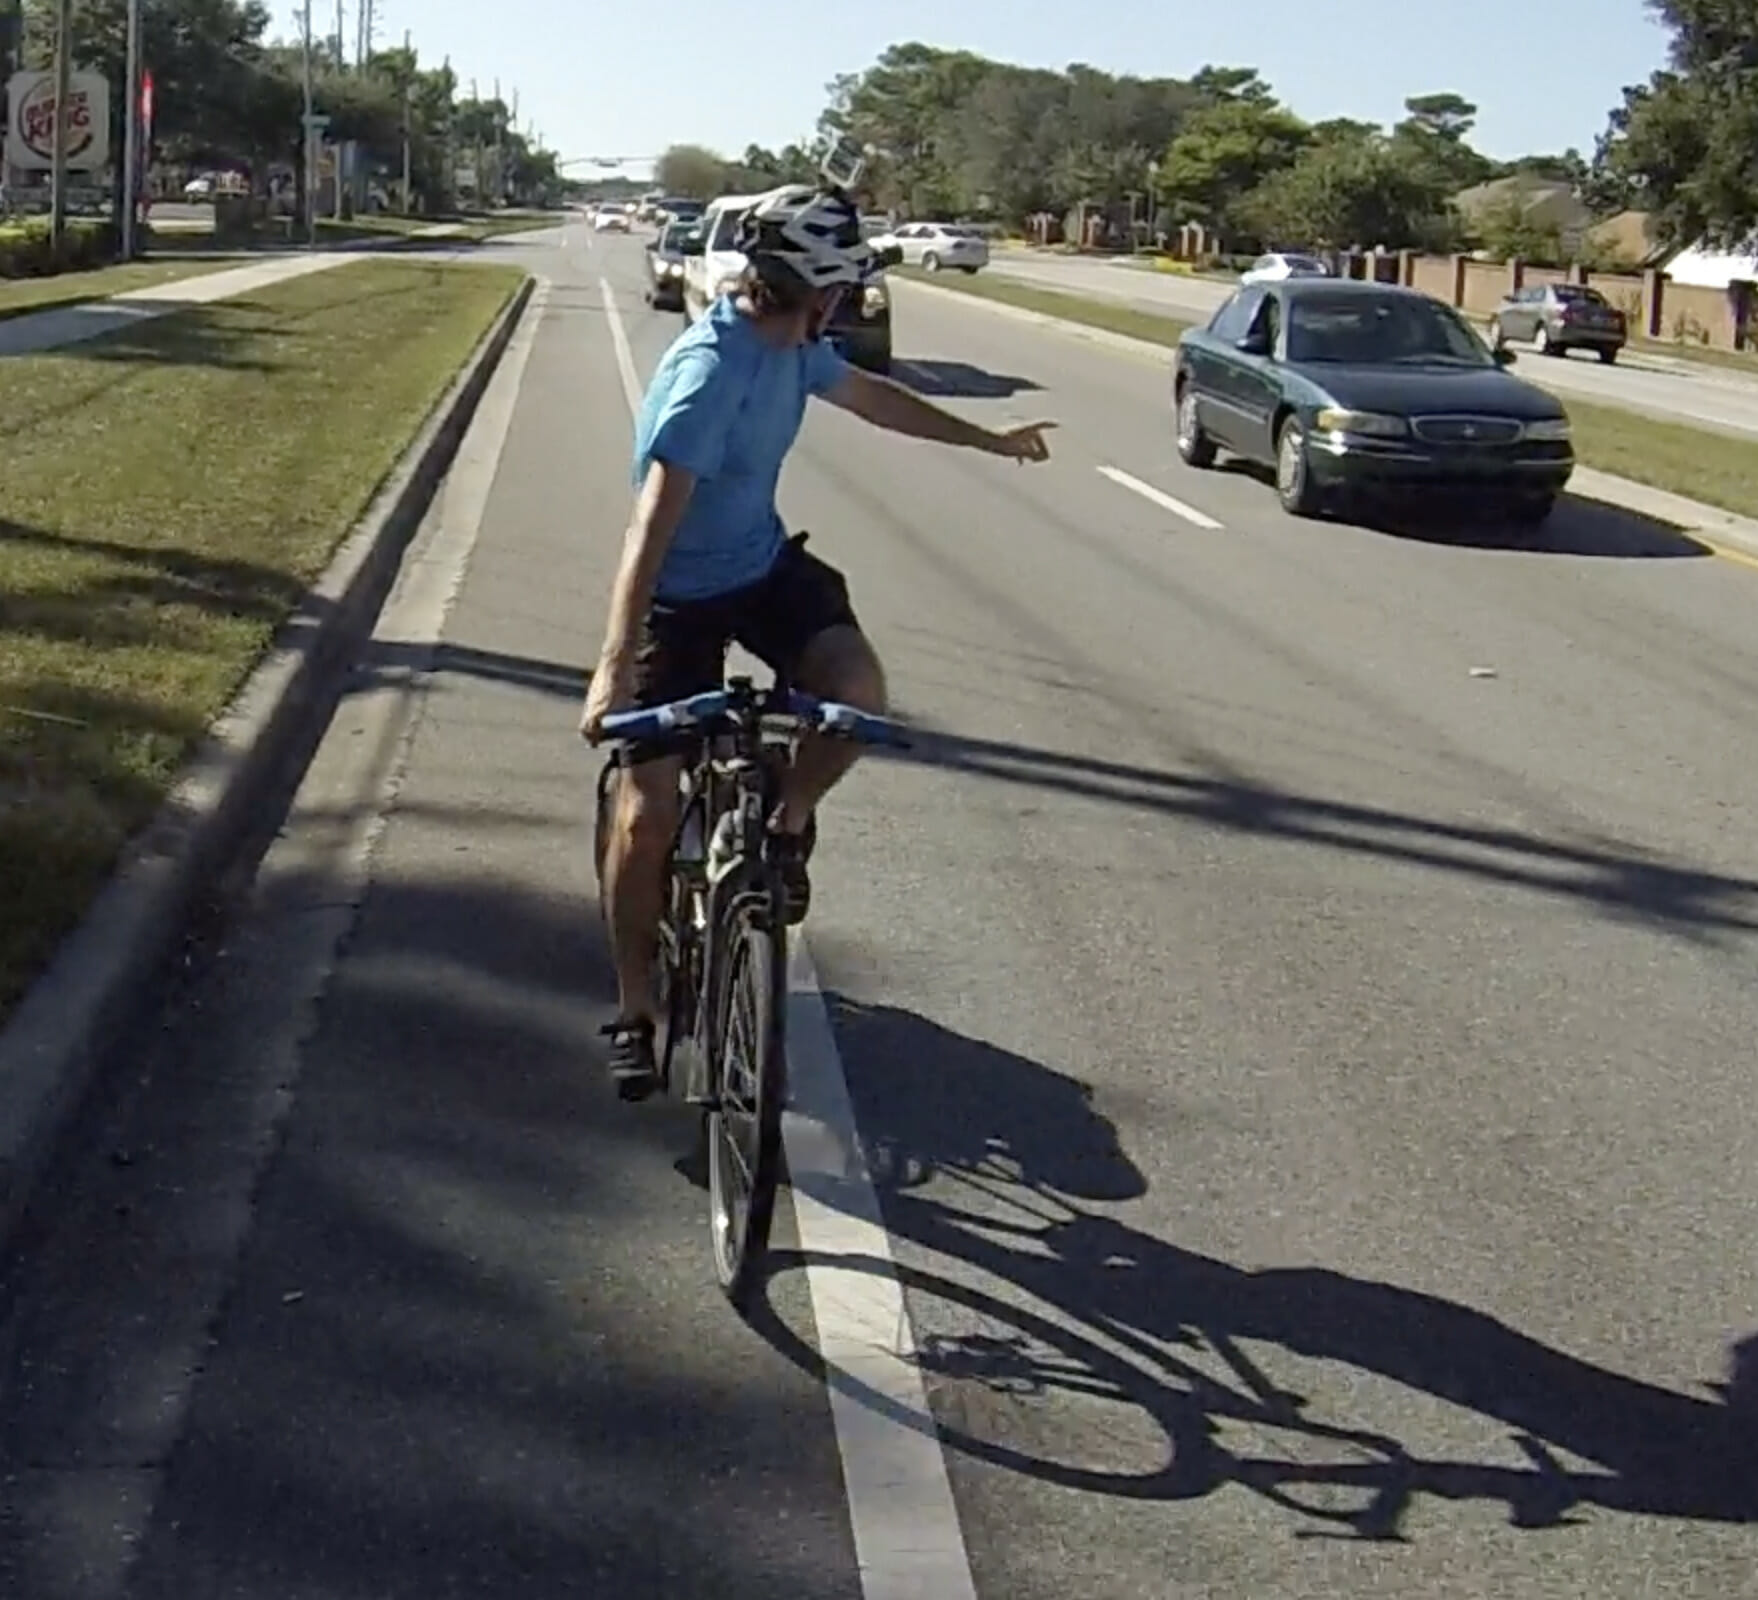
  • To change lanes to position yourself correctly for your destination, negotiate with the driver of the vehicle you have just passed. In these close quarters, you can actually establish face-to-face communication.
  • Don’t pass the first vehicle waiting at an intersection. You can’t know which way it will turn: people forget to use turn signals, or change their minds about which way to go. You might also check whether the front wheel is turned toward you. 
stop between the first and second car when filtering forward
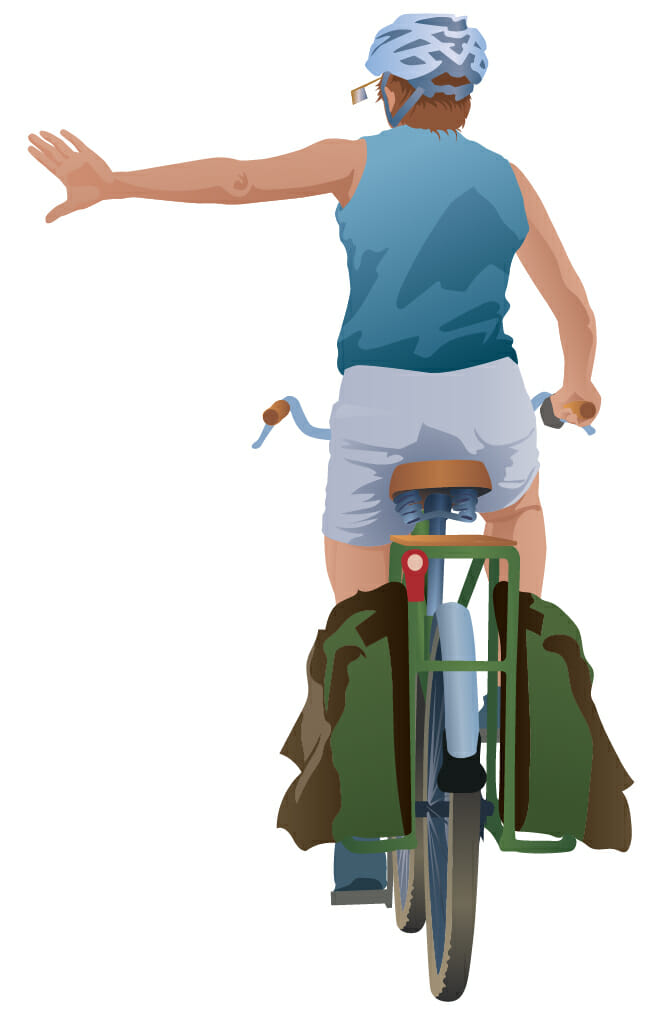
  • As traffic starts moving, signal to the driver behind you and move into high-vantage position (where you can see past the left side of the vehicle ahead of you). As traffic gets moving faster, you may release lane control as appropriate. 
  • To the extent possible, be visible and communicate
  • Honor first come, first served. Before you pass a queue in a narrow lane, consider whether the traffic will be moving fast again after the light and how difficult it will be for those same drivers to pass you (again… because they may have passed you once already).
  • Enter an intersection only if you can get through it. 

Yes, it’s slow, but…

Complicated and slow? Yes, but even at 5 or 6 mph, you are going faster than the drivers stuck in their traffic jam.

First come, first served conundrum 

At the head of a long queue
I can pull into the bike lane ahead to let the long queue behind me pass.

What if you’re on a 2-lane road and come to the end of a long queue at a red light? You know you will not make the green light if you stay in the queue.

You might even sit through more than one cycle. Even worse, the light could change and the line of cars could pull away from you. And then you are the reason the ones behind don’t make the green light.

It makes sense to filter forward. But then what if you’re in front of everyone and the light changes, and now they can’t pass you easily?

What now? One strategy is to go through on the green, then pull over and wait for the platoon to pass. The light will change eventually, shutting down the traffic and allowing you to move forward on a nearly empty road for a while. Often, this could be as much time as you need to get to a wider stretch or your next turn.

Congested two-lane roads present the most challenging and unpleasant environment for bicyclists. Multi-lane roads seem more intimidating, but are less stressful.

Lead us not into temptation

People like to get ahead. Many bicyclists find it tempting to break rules to get somewhere faster. 

Congested traffic increases temptation, because of the need to slow and stop repeatedly. 

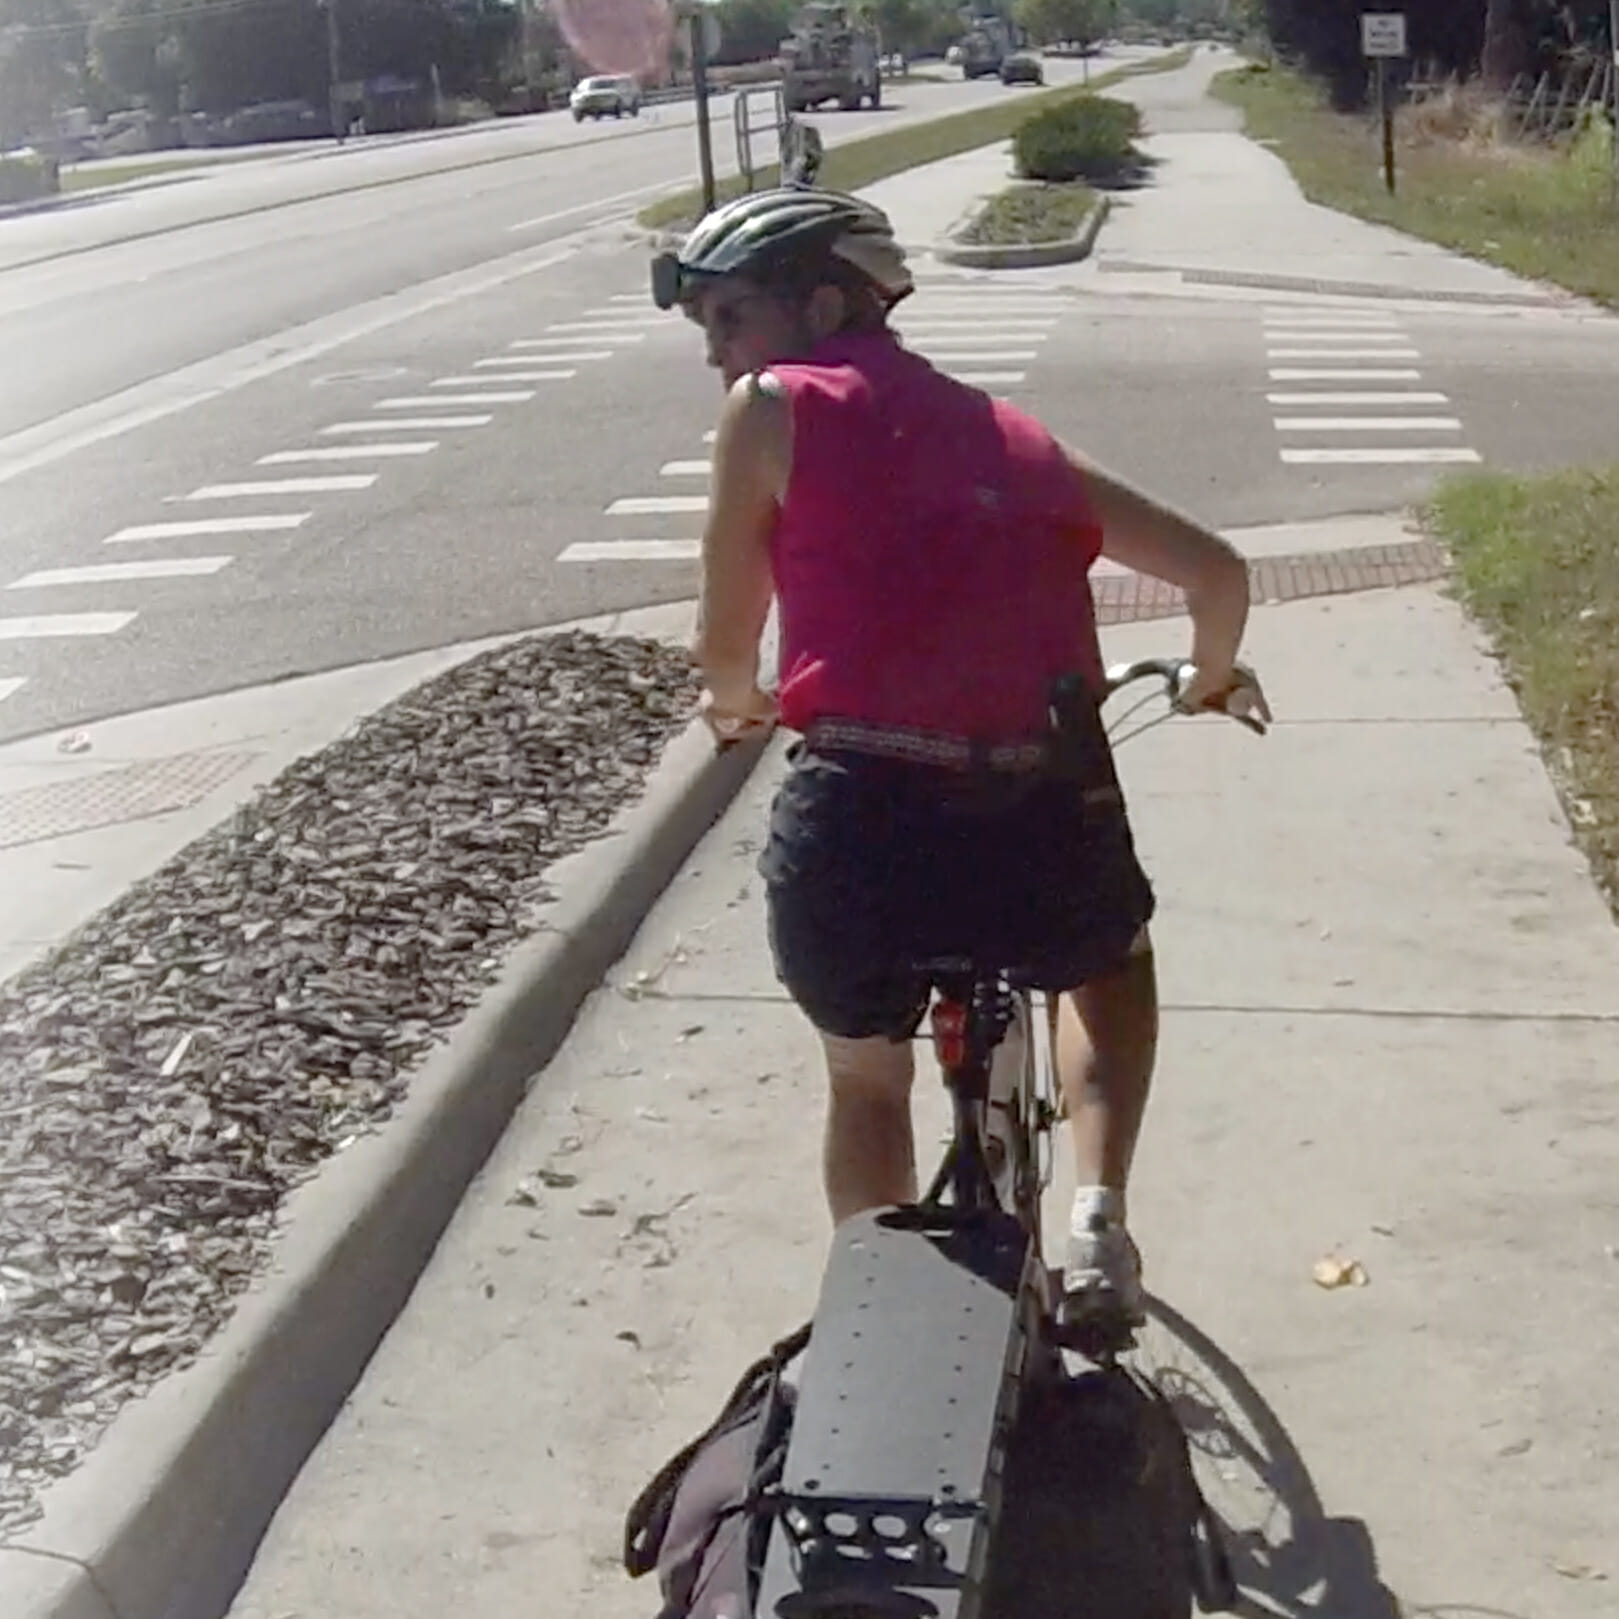
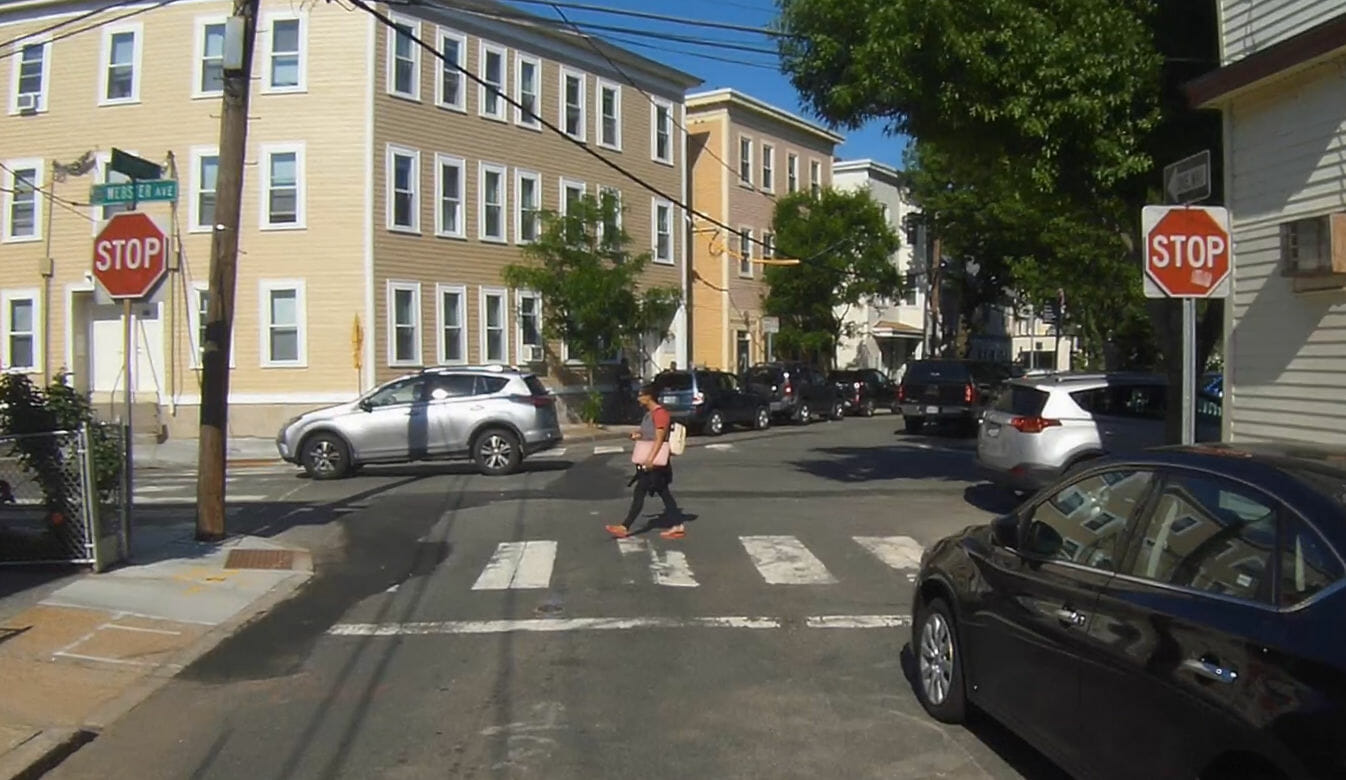
Sometimes strategies can actually increase delay. For example, while the sidewalk might seem faster, pedestrians are always shortchanged by signal timing at intersections. Riding as a bicycle driver, I have often passed bicyclists who attempted to get ahead on the sidewalk, but got stuck. The cyclist whizzes past me on the sidewalk while I am stopped in the queue. Then the traffic starts moving and I pass that bicyclist, who is waiting to cross in a crosswalk. While it’s tempting to violate a red light or “don’t walk” signal, you assume the liability if someone hits you while doing that.

Beware of manufactured temptations

A number of measures intended to make bicycling more attractive or safer can create a false sense of security, or make it easier to take risks, or both.
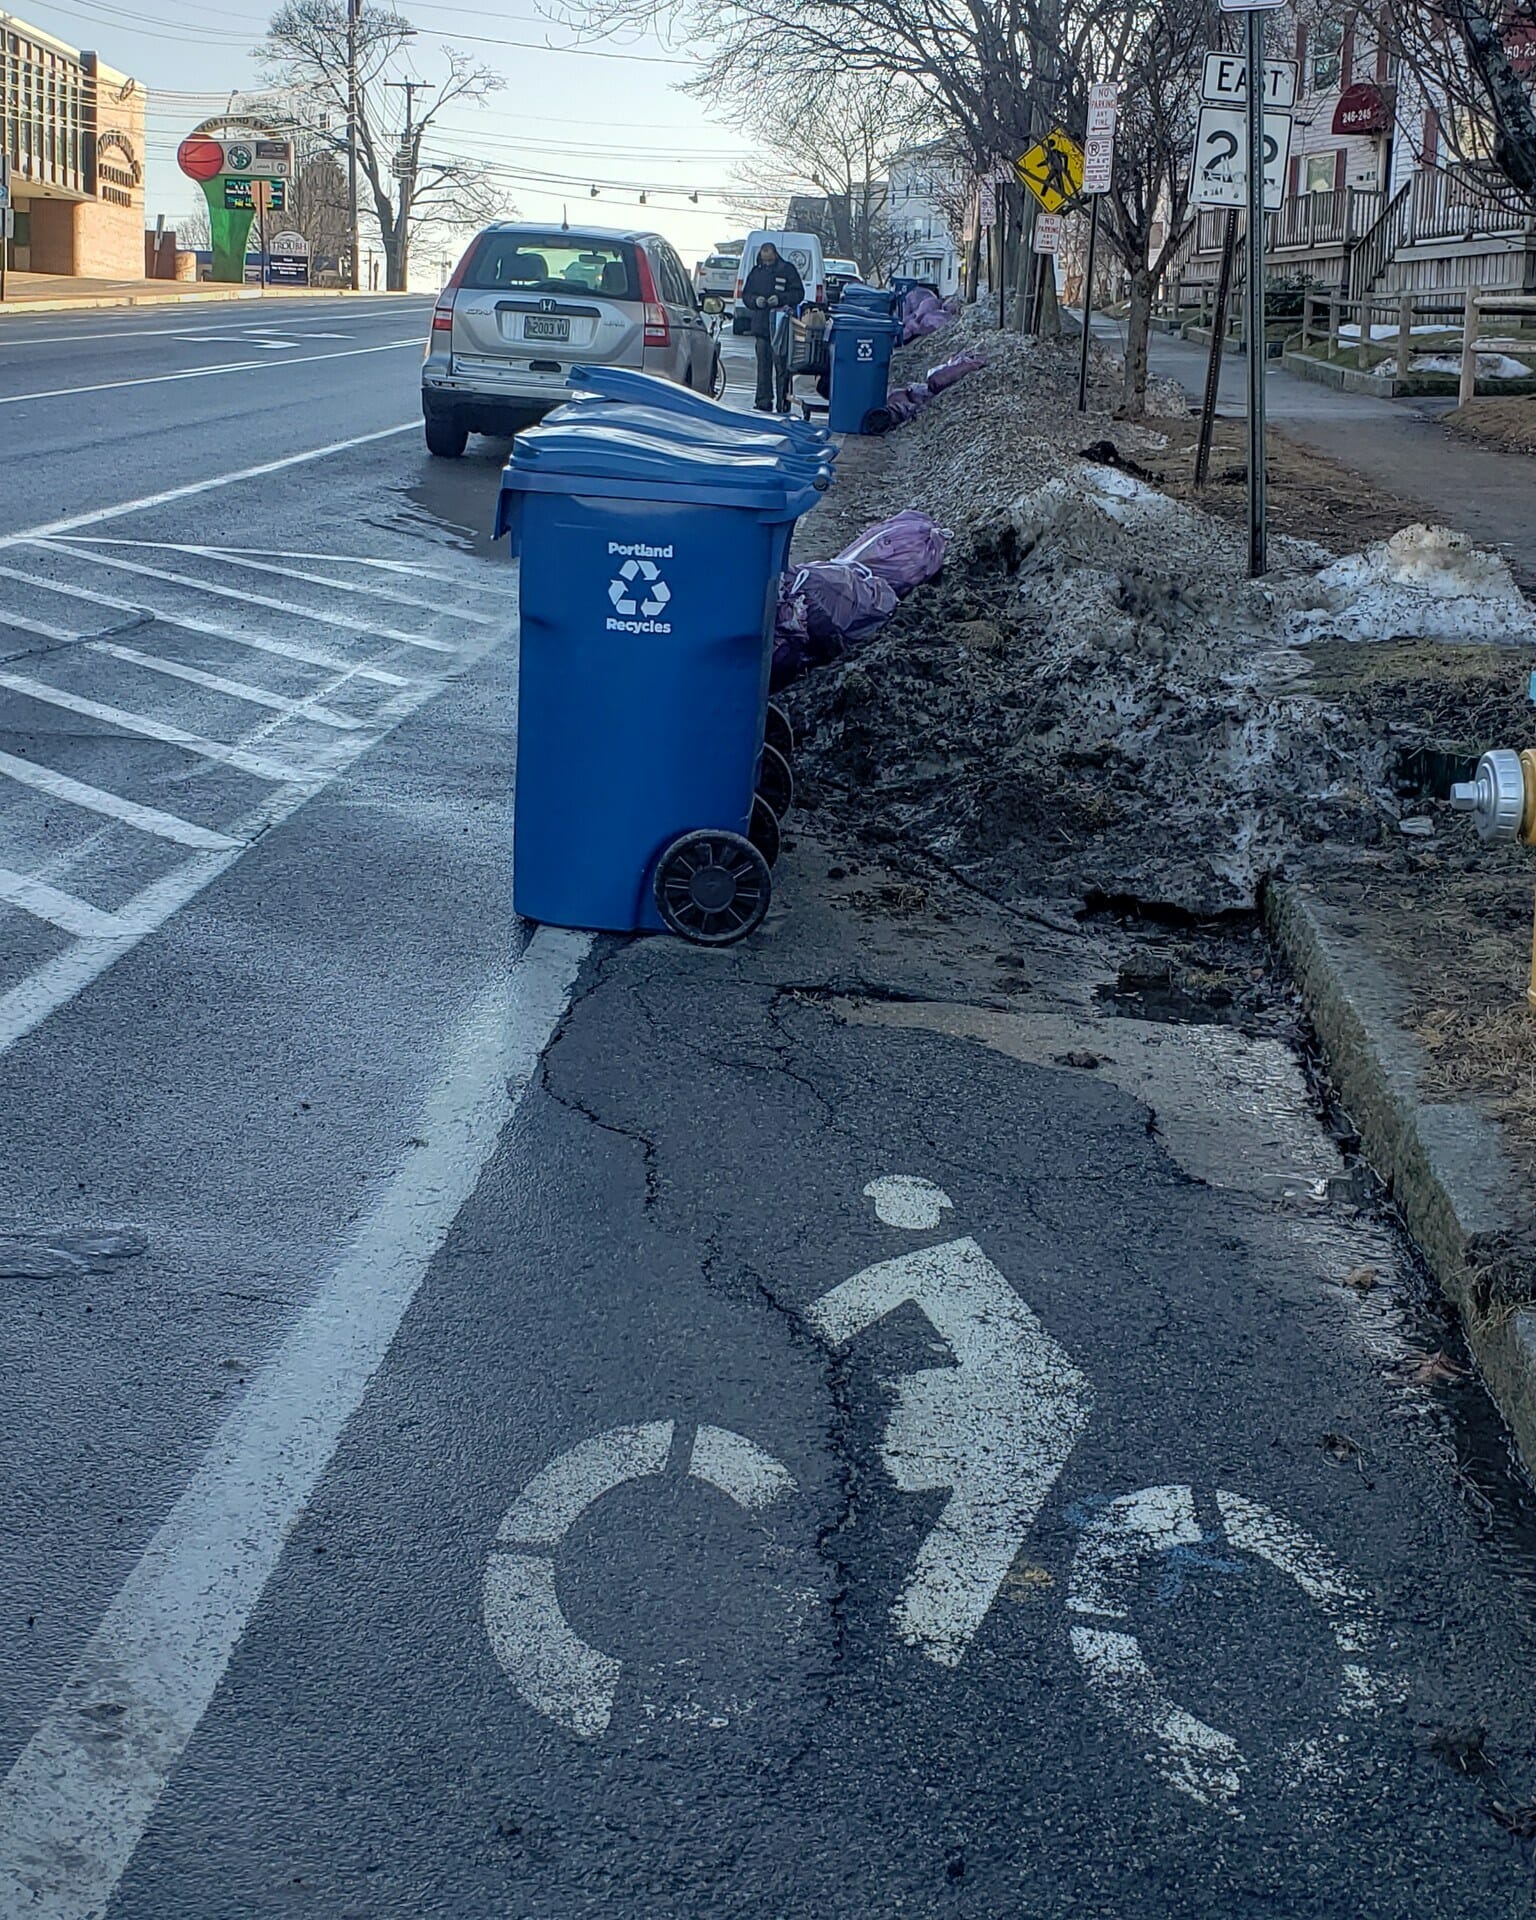
Bike lane…

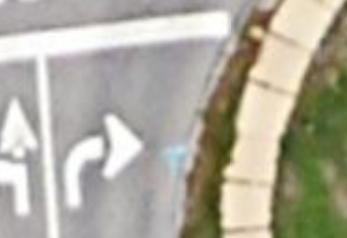
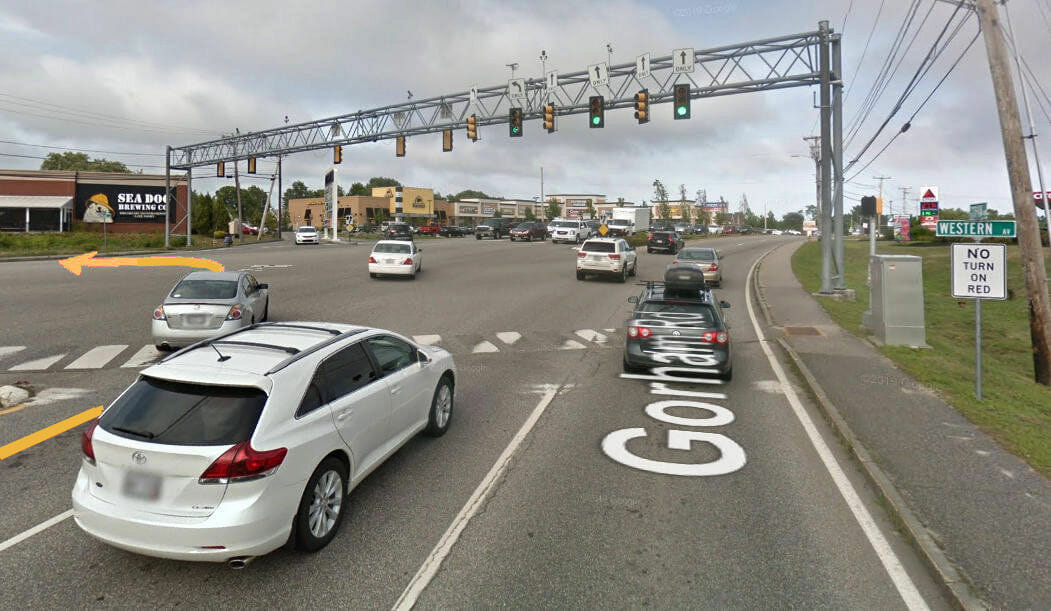
A striped bike lane makes it much easier to pass on the right. The wider channel to the right of stopped traffic invites bicyclists to filter forward, and at higher speeds. But, contrary to popular belief, bike lanes do not increase motorist caution or awareness. A bike lane does not give you x-ray vision to see through stopped and parked vehicles, or clairvoyance to anticipate conflicts. The same cautions apply with or without a bike lane. Since I shot the video above, bike lanes have been striped at the location. They increase mobility, but not safety, when motor traffic is at a stop.

Bike box…

A bike box— also also called bicycle waiting area — invites bicyclists to filter forward in a bike lane, and then wait ahead of the queue. It takes the concept of jumping the queue to a higher level, lending official support to bicyclists’ getting ahead of the line. 

A bike box invites bicyclists to swerve out in front of motor vehicles.
A bike box invites bicyclists to move in front of motor vehicles.

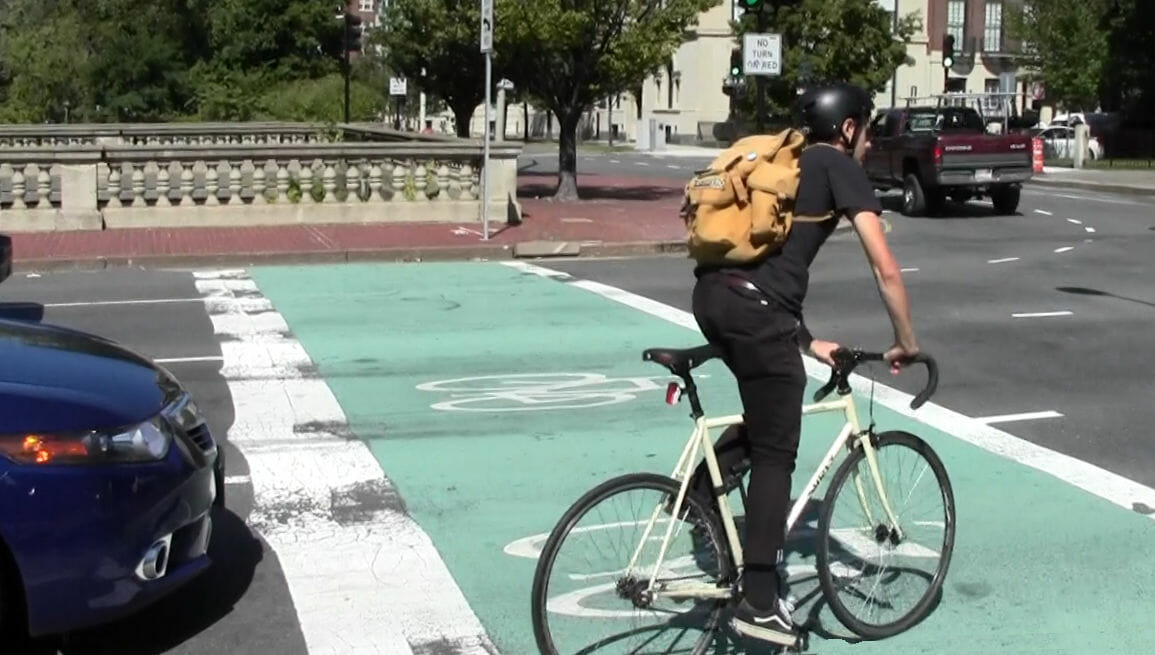
Sounds great, right?

Do you know when the light is going to change? Right on red is prohibited where there is a bike box…Everyone must turn right on green. If you arrive just after the light has turned red and the first vehicle has stopped, it’s safe to move into the box in front of it. But what if the light has been red for a while? It could turn green just as you get there. It’s not just a risk to move in front of cars that are about to move, some of those cars may be waiting to turn right. Arriving at the intersection just as the light turns green puts you at risk of being right hooked, or cut off by a line of right-turning cars. Slipping into the queue before you reach the intersection can keep you clear of this risk.

Barrier separation…

A barrier-separated bikeway does not remove crossing and turning conflicts, and can make them worse if the barrier is opaque — vegetation or a wall of parked cars. It presents the same crash risks as when riding on a sidewalk. Oh, and while safety is increased by separate signal phases at intersections, so is delay. Always, always, the “cars” will get the lion’s share of the green time.

Rely on yourself, no one else is looking out for you

Several measures attempt to make motorists more attentive to bicyclists. These measures include green paint in the bike lane, a “yield to bicyclists” sign, a “watch for bicyclists” sticker for a driver’s side mirror. All of these measures depend on the motorist’s remembering to look… which relies on their paying attention and being present. Good luck with that. 

Summary

Many of us are proponents of the principle of same roads, same rules, same rights. As with any ideology, it’s senseless to take this to the extreme. This is one more reminder that the biggest cause of significant delay in the road system is cars. Traffic congestion adds hours to car trips. One of the advantages of driving a narrow vehicle is that you can slip past all that delay. While filtering forward is risky, you can avoid trouble by understanding the risk areas and being mindful and cautious.

The Quarter Mile Stroad Hack

In my initial “Stroad Hack” article, I described a hack involving two intersections. I referred briefly to the quarter mile on a different stroad, but I didn’t go into detail on that.

This post will focus on the quarter mile, on Gorham Road. It stretches from left to right in the image below. I use it quite often to go to my dentist’s office.

The quarter mile on four-lane Gorham Road, from Clark's Road to Western Avenue

Use Online Maps…and Work Backwards!

Route planning has of course always used maps, initially on paper. I rely heavily on online maps in these articles, and particularly on Google’s ground-level Street View. Zooming in on Google’s satellite view lets you plan your lane choice. That is especially useful on multi-lane roads that you may be apprehensive about.

Always Use Maps?

So, is it necessary to plan every stroad route with mapping? No, I don’t think so. One of my favorite ways of riding is to explore a new area when I go on vacation. Serendipity is an important aspect of those rides for me. “Hey, that road looks interesting, let’s see what’s down there.” Cycling by the rules of the road is generally safe, even on an unfamiliar road. But you may want to choose mapping, especially when you know you will be on uncomfortable roads. It can allow you to make more informed decisions so the journey is more comfortable.

Mapping is also useful for illustration in these articles. I am using Google Earth for these images, although Google Maps works too. Custom maps are a great teaching tool!

Why work backwards?

When planning a route, it is often useful to start from the destination and work backwards. That way, you’ll see what works as you approach it — and at each step as you work backwards to the start. For that reason, I am numbering the following hacks in reverse order, going back from from the turn into the dentist’s office, to the quarter-mile segment, to the start.

Hack 3 – Lane Choice onto Western Avenue

Western Avenue, center turn lane to turn left to the dentist's office

My dentist’s office is on the left side of Western Avenue. Conveniently, Western Avenue has a two-way center turn lane where I can wait for oncoming traffic to clear, before turning left into the driveway. If I’m already controlling the leftmost through lane, moving into the center turn lane as soon as it opens up is trivial.

Left turn onto Western Avenue

Following the rules of the road for drivers, you must use the left-turn lane to turn onto Western Avenue from Gorham Road. If you’re uncomfortable with that, you can dismount and use the crosswalks. But we won’t go into that here.

What lane on Western Avenue do you turn into? Bicyclists who feel like they must always stay to the right might be tempted to turn into the rightmost lane, because “bikes stay to the right”.

Then Why Turn into the Left Lane?

There are (at least) two reasons to choose the left lane. For one, it’s more common when turning onto a multi-lane road to turn into the closest lane, Maine laws do not actually require that, though some states do, and it makes sense here regardless.

There’s an important operational reason here too: It’s only about 225 feet from the intersection to the center turn lane. It’s only about 100 feet more to the driveway. That’s only 25 seconds at 10 MPH. It makes no sense to turn into the right lane, then immediately have to change to the left lane to get to the center turn lane. If you do that, any traffic behind you will turn into the left lane to pass you, and will block your lane change. Why not just turn immediately into the left lane? Any traffic behind you will pass you in the right lane, which is exactly what you want anyway!

So there’s one hack: Turn from Gorham Road into the left lane of Western Avenue.

Hack 2 – Lane Choice onto the Quarter Mile

Continuing backwards, what about the lane choice onto Gorham Road?

Choosing the left lane when entering the quarter mile on Gorham Road

This decision is like the last one. You’re going to spend less than 1/4 mile on Gorham Road (just over a minute at 10 MPH) before you turn left onto Western. So why turn into the right lane and have to change immediately?

Objections?

Granted, that’s a bit longer time spent in a leftmost lane than on Western Avenue. And that might bring up another objection, that motorists don’t expect bicyclists to travel in the left lane for an “extended” time. In”motorist time,” that may be about 10 seconds. 😉 But in our experience, visibility to people approaching from behind more than makes up for any surprise they may have. They still have plenty of time to see you and react.

If you are in a left through lane because you will be turning left shortly, try making occasional left turn signals. I think people are more patient if they understand why you are doing what you are doing. It may also be that they respect you more if they feel like you know what you’re doing. (And as a Savvy Cyclist, you do!)

Evaluating Convenience

I sometimes would still have had time to change lanes if I turned into the right lane here. But I don’t know that when I make the turn. And, whichever lane I choose, motorists behind me in that lane will have to change lanes. So it comes down to a balance of convenience: how convenient is which lane for me, and how many motorists will have to change lanes? Results vary by location, by time of day, and by what the traffic happens to be at that moment. But in this place, I don’t try to overthink it, and simply choose the left lane. The next and final hack makes that even easier.

Hack 1 – When to Turn Right onto the Quarter Mile

Here’s one I never learned until I took CyclingSavvy, even after I had been become a certified instructor with another national cycling program. I’ll frame it as a question:

Q: When would you not want to take a right turn on red?

Everyone makes right turns on red, right? Why wouldn’t you? Bicyclists don’t like delay any more than motorists do. (Consider how many cyclists don’t bother stopping at lights if they think they can make it through. And how many pass even a short line of stopped cars on the way there.)

Red Lights Create Gaps

The answer never occurs to most motorists, including me before I started bike commuting. But you may have noticed it if you’ve cycled in traffic for very long: traffic travels in packs.

And why does this happen? In urban and suburban areas, it’s because of red lights. A red light collects a line of traffic while it’s red. Then it turns green and the whole pack surges forward.

The flip side to this is that red lights also create gaps. While that light is red, the only traffic entering the intersection is turning into it from the left or right (as we are in this case). This is nearly always much less traffic. Therefore, there are gaps for as long as the light is red. And effectively longer, because you’ll have traveled away from the intersection!

We have videos in our Truths & Techniques and CyclingSavvy Mastery courses showing gaps of more than a minute in length created by long light cycles, even at rush hour. You can also see it in this Smart Moves video about riding across a high-speed interchange.

Waiting for the Green when Turning Right…

So, a very basic hack that you can use at every signalized right turn is: Don’t turn right on red. Even if you are allowed to turn right on red, you may wish to wait. Waiting for your green guarantees that you will have a gap with very little or no traffic behind you (except the few that turn onto the road during that time).

Of course, if traffic is light, it may be fine to turn right on red once the initial pack is clear of the intersection. This is especially so if you have the sight distance to see that there is no more oncoming traffic for quite a while. That’s fine. This is a tool, not a hard and fast rule.

As I turn right from Clark’s Road onto the quarter mile segment on Gorham Road, though, the traffic from the left is coming around a curve, so it’s impossible to tell how long until more comes. And it will probably be traveling at the posted speed (or greater) by that time, maybe even racing a yellow. So I almost always wait for the green here.

A curve reduces sight distance for traffic from the left when entering the quarter-mile segment of Gorham Road.
Notice the curve in Gorham Road, limiting the distance from which you can see traffic coming from your left as you wait to turn right.
The curve on Gorham road that reduces sight distance
Google Street View looking left from Clark’s Pond Parkway, about to make the right turn.

Car behind you?

What if, you may ask, there is a motorist behind you who would like to turn right on red?

Positions to allow motorists to turn right on red when waiting to turn right on green into the quarter-mile segment

Well, you can simply move over and motion for them to go ahead. Whether you move depends on the geometry. In this case, the right turn lane gets wider, so I tend to stop at the extreme left side of it. That way, I leave room for a car to turn on my right. I’ll motion for the driver to do that if necessary.

Where the turn is more squared off, you may not be able to extend this courtesy. Moving to the right can put you in a position to be cut off by turning drivers when the light changes.

Summary

In this article, I showed a typical bike trip from my office to my dentist’s office around the corner. In that trip, I utilized two different CyclingSavvy stroad hacks. First, I chose to wait for a green light to make the right turn onto Gorham Road, to ensure that I could turn into a gap, and be well established on the road as I prepared to turn left onto Western Avenue. In many cases, I’m already pulling into the left turn lane before any traffic catches up to me!

Secondly, I turned directly into the left through lane, twice. In both cases, it was because it was a short distance to another left turn, so it was not worth starting in the right lane and then changing. Traffic turning behind me has a clear lane on my right to pass me in.

These two general purpose hacks are applicable on any stroad, in a great variety of situations. Having these tools in your toolbox will greatly ease the friction that you might otherwise experience on such car-centric roads. They are what makes you a Savvy Cyclist.

chamelion riding bike

Do Look Back

We humans have our eyes in the front of our heads. Stereoscopic vision worked great for our ancestors who hunted and gathered for food. It also works great to keep track of what is going on in front of us as we ride bicycles—a good thing since that is where more than 95% of crash threats are.

Eyes in the front of the head don’t work as well when we need to see what is behind.

Understandably, humans have primal fear of what approaches from behind. When we take this fear onto the roadway (fearing our fellow humans), it can cause us to misplace our attention. I’ll come back to this.

How can we have some peace of mind with what’s behind?

Thanks to skills, and equipment, I ride without fear on city streets and rural roads. You can too.

Practicing looking back while bicycling

Number one skill is turning the head to look back. CyclingSavvy has an exercise for this in our Train Your Bike session. (You are actually training yourself, but it feels as though the bike is getting more cooperative…) You need to practice this until your are good at it. In the Train Your Bike session, one rider follows another in a straight line, holding up one to five fingers. The lead rider looks back and calls out the count of fingers.

The tough part of this exercise is to keep riding in a straight line. The organs of balance are inside your head, and the fluid in them sloshes around when you turn your head. It takes practice to compensate. Riding along a line in an empty parking lot lets you check on your progress.

There are several techniques for looking back without losing control of the bike.

shoulder check illustration - relaxed method

Relaxed method: relax your arms, allowing them to be slightly bent, then rotate your head to the side. This technique works well for people who are limber. A variation of this on a racing bike is to look under your arm.

shoulder check illustration - stiff arm method

Stiff-arm method: to keep from pulling the handlebar with you when you turn, lock out your elbow and tuck your chin to your shoulder. This technique works well for beginners.

shoulder check illustration - turn around

Full rotation method: sit up straight, take one hand off the handlebar and rotate your shoulders as you look back. This technique not only gives you the best look, it shows your face to the driver behind you. And your hand is free to communicate (signal a left turn, ask the driver to stay back, or ask the driver to pass.)

Use a mirror to look back?

What if you have a stiff neck, or ride a recumbent bicycle so you can’t turn your head far enough?

Then you absolutely need a rear-view mirror.

Otherwise, the choice depends on your fear factor, and on where you ride. A bicyclist’s view is unobstructed to the rear, unlike that of other drivers — even motorcyclists with their bulky helmets. A mirror might not do much for you if you ride on paths and lightly-traveled streets with low speed limits.

In her recent post Nobody Expects a Bicyclist to Go Uphill at 20 Mph, Keri Caffrey recommends a mirror on rural two-lane roads, where she has to decide if and when release the travel lane.

I wouldn’t be without a mirror riding in urban traffic. A glance into the mirror every few seconds gives me uninterrupted front and rear situational awareness. More about that later.

A bicycle mirror may attach to the helmet, the handlebar or the eyeglasses. I prefer a helmet mirror. It is always there when I put on my helmet, and won’t get smashed if the bicycle falls over. But, different spokes for different folks. Want more details? John Brooking has an article about mirrors on this site, and Brian Watson has another.

Now, how to use a mirror. It shows what is behind you, not what is coming up next to you. Turning the head is still necessary, though not as far or for as long. My helmet mirror lets me scan side to side by turning my head slightly. The body does get in the way with a handlebar mirror, and so you have to turn your head all the way to look to the opposite side.

Other options

Your hearing can warn you that something is back there, but can’t confirm that nothing is there. Your hearing won’t warn you of a fast bicyclist about to pass you — or an e-bicyclist or e-scooterer, e-skateboarder, e-unicyclist. E-eeks! On paths too, whether legal or not!

A radar device sold to bicyclists bounces a signal off vehicles approaching from behind, and beeps warnings. Fine, if you don’t mind spending a few hundred dollars. The radar device will tell you that something is gaining on you, but it won’t advise on passing clearance. You still have to look back figure out what to do, a fact which its promotion neglects to mention. In heavy traffic, the radar device is useless because it has a “cry wolf” problem: too many warnings. All in all, a $20 rear-view mirror is more effective, once you have developed the skills to use it well.

The main reason to look back is to prepare to change lane position.

Looking back to prepare a lane change

Clear communication is essential to handle this situation safely. Look back, well in advance, when you have time to make a hand signal to drivers of the first and second vehicle behind you. Or maybe there aren’t any vehicles behind you. Maybe there is only one, and you can slow slightly and let it pass, then merge. But if there is a line of traffic, make the hand signal. Look back again. The first driver will almost always let you into line. To avoid confusion and frustration, merge into line as soon as you can see that the driver has slowed to follow you. This is where becoming comfortable with a solid look-back is critical. You need to not only see the vehicle, but recognize when the driver is slowing to let you in.

By communicating with the driver, I get to know what kind of person I am dealing with in advance. The bicyclist who waits till the last moment to swerve out learns the hard way, during the actual pass.

Letting go and trying again

If a driver ignores your signal, you don’t want to deal with that person anyway. The next driver has more time to observe and react to you, and may even feel sympathy with you! Only rarely do I have to stop and let traffic pass when I would have liked to be let into line.

At any time, quick glances into the mirror are useful to scope out what is approaching from behind. A large truck needs a much longer lead time to slow than a small car. I might see that I can cross a lane in a gap and not have to negotiate with any driver. And so forth.

Turning the head signals to drivers behind me that I have looked and am aware of them. Often I’ll do it even if a shoulder check isn’t necessary.

You need to look back on paths too.

Looking back while riding on a sidepath

Though speeds are slower, paths are narrower than streets, and can be crowded: close passes are common. There will always be someone slower than you. It might be a little kid on a tricycle who is weaving and wandering. You need to look back before giving the kid a wide berth.

It’s also an essential skill for sidewalk and sidepath riding. You need to look back for turning vehicles coming from behind you (right or left hook).

Misplaced attention

Now let’s examine how riding on streets feels to a person who does not look back.

This bicyclist often will say “cars don’t see me.” That is a giveaway that the bicyclist does not think of the car as controlled by a driver. To this bicyclist, the car is an uncontrollable threat coming from behind. That prevents the bicyclist from communicating with the driver, as described earlier in this article.

Cars depicted as mindless, marauding beings

The image on the right, from the cover of a 1970s counterculture magazine, illustrates how many bicyclists think of their fellow road users. Only one of the 27 bicyclists in the picture is looking back — but also the cars have teeth for the radiator grille and big, hungry eyes for headlights. Believing that cars are uncontrolled can lead to this sick joke, that they are out to have bicyclists for dinner. Fear does arouse some primal instincts.

But a car is not the tiger chasing you. It is under the control of a driver, another human being like you. In the future, the driver may be a robotic controller, but it still amounts to the same thing: most drivers will act reasonable if you only show them what you want them to do.

Predictability + Communication = Cooperation

A bicyclist who believes that safety consists in staying out of the way as much as possible, then swerving out at the last moment around a parked vehicle or other obstacle, is asking a lot of a driver approaching from behind. This bicyclist is suddenly in the way. The driver failing to anticipate an unpredictable move may still react in time, but will be much angrier than a driver who waits a few seconds for a predictable and communicative bicyclist.

Bicyclists who misplace attention are more likely to experience close calls and angry honking, exacerbating the fear of cars motorists. It’s a vicious cycle.

If you are an adult of normal abilities, there’s no need to ride scared until some off-street utopia materializes. An informed understanding of risk, a recognition of your fellow road users as people, and a few simple skills will make your bicycling experience enjoyable.

Western Avenue looking back from Foden Road: nearly empty.

Stroad Hack!

Riding on stroads gets a bad rap in the bicycling world, and with good reason. Planner and engineer Charles Marohn, who coined the term, describes stroads as a combination of a local street and a higher speed connector road, in which

engineering codes tend to emphasize speed and traffic flow rather than safety, so that stroads try to be “all things to all people” but end up failing in every way as a result.

https://en.wikipedia.org/wiki/Stroad

All stroads feature at least two lanes in each direction. Unfortunately, my office is located near the local shopping mall, so stroads are an everyday part of my bike commute.

CyclingSavvy Stroad Strategies

Because this is a reality for many commuters, we spend a lot time in CyclingSavvy on strategies for riding on stroads. Can it actually be fun and relaxing? Granted, that is probably a stretch for most people, although some of us have been known to push that point occasionally. Yet I think Savvy Cyclists would agree that it actually takes less skill to ride on some stroads than on some local roads, once you’ve got the confidence, lane position, and communication. Contrary to popular belief, you don’t have to be “strong and fearless”!

Many of our strategies minimize time spent on stroads through timing and placement of entry onto them. Gaps in stroad traffic, even at rush hour, often let you have the road all to yourself for a minute or more at a time!

Riding on Stroads to Staples

Recently, I needed to stop at the Staples office supply store on my way home. Staples is about a mile and a half away, along a 4-lane stroad called Western Avenue.

I’ve often cut through a lightly-used parking lot. That cuts my time on Western Avenue to about 1/3 of a mile, compared to 3/4 of a mile by the shortest all-road route. There’s an additional quarter mile on another stroad, Gorham Road, to get to Western Avenue. We also have a strategy for that segment…to be covered in an upcoming post.

Riding from my office at the bottom to Staples to the north, yellow/green line is the parking lot route (green is the parking lot). Orange/red is the route with the longer stretch on Western Avenue (red). Major intersections with Western Avenue are at Foden Road and Gorham Road.

So, no brainer, let’s take the parking lot cut-through, right? (Beware that busy parking lots can often be more dangerous than roads. Traffic is less orderly and sightlines can be bad. But this parking lot serves an office building with low occupancy, so it’s usually nearly deserted.)

That’s what I usually figure. But this time, I had a different idea. Before I left, I used Google Maps satellite view to review the intersection configurations.

Foden Road intersection, where the parking lot route has me turning left onto Western closer to my destination (yellow line).
Route with more riding on stroads -- the stroad hack
Gorham Road intersection, where I turn left onto Western Avenue sooner (orange line).

Riding on stroads: better?

So which route will be the more relaxing? Sure, the nearly deserted parking lot will be more relaxing than the stroad anytime. But will avoiding one intersection and minimizing time riding on stroads necessarily make for a better experience? What exactly will be the difference in experience on Western Avenue? How would you know?

Hint: Look at the intersections. Specifically, look at how traffic turns onto Western Avenue (top left) in each case.

(Jeopardy music…)

:

:

:

Give up?

Check it out:

Using the parking lot route, I turn left onto Western on my green, with traffic stacked up in both lanes to my right, soon to be behind me (red arrows).
Turning left onto Western sooner, any traffic entering behind me is coming from only a single lane, no matter which direction it is coming from (green arrows).

And the winner is…?

Using the “easier” parking lot route, I enter Western Avenue on a short green light. Motorists are very likely waiting in both through lanes to my right (red arrows). Soon after I turn, when they get their green light, I’ll almost certainly have traffic behind me in my lane. That traffic will not be able to pass me right away because there will still be traffic in the left lane too.

Left turn from Foden Road (green arrow): traffic from the right will soon start up.
Left turn from Foden Road (yellow arrow): traffic from the right will soon start.

Compare this situation to turning onto Western earlier, at Gorham Road. There, traffic from any direction behind me enters in just a single lane, so the passing lane is guaranteed to be clear for a while after I turn. Motorists coming up behind me will have no problem changing lanes right away. Then, as I continue along Western, subsequent traffic from behind me also has plenty of time to see me and change lanes. Each passing driver clears the sightline for the person behind them, and so on.

Counterintuitive

Granted, I still have to go through the same Foden Road intersection. But even then, any motorist coming up behind me sees me ahead, and is likely to change to the left lane before the light, to avoid getting stuck behind me. When I take the parking lot route, turning left from Foden, drivers on Western have no idea that I am about to be ahead of them. They have no chance to avoid the delay. Then they are surprised, and sadly, in some cases, annoyed.

Counter-intuitively, the route that has me riding on stroads longer actually reduces motorists’ getting “stuck” behind me. It’s not my job to protect their emotions, but still, if I can set myself and everyone else up for an easier time, why wouldn’t I?

Left turn from Gorham: looks harder but it is easier.

So, that day, I took the less intuitive route and spent more time on the stroad, and it was absolutely fine. I didn’t notice anyone needing to wait long, if at all, to change lanes to get around me. There was absolutely no incivility. Move along, nothing to see here. Just another day of ordinary bicycle transportation with CyclingSavvy.

Western Avenue looking back from Foden Road: nearly empty.

Follow us for more CyclingSavvy traffic hacks!

Charlotte CyclingSavvy Instructor, a Hero…?!

Charlotte CyclingSavvy Instructor Pamela Murray never stops surprising me. The latest? A five-minute segment on North Carolina Public Television. See it here:

Thanks to Rossie Izlar of PBS-NC for producing this segment! It nicely summarizes Pamela’s message and her activities. Pamela’s message is as positive as her smile.

What, a Hero?

Hero? Just for riding a bicycle? That may be the first impression of many people reading the video’s title.

But bicycling as Pamela and I know it is centered and stress-free, not heroic. Pamela has used CyclingSavvy techniques in cities and on bicycle tours tour all around the USA, and reports that these techniques work everywhere.

Pamela asked that I make a correction: SHEro. Well, OK.

Having had the pleasure of knowing and working with Pamela, I do see her as a shero — for her humility, and energy which she devotes to the many activities she organizes and leads: CyclingSavvy courses, the weekly Plaza Midwood Tuesday Night Ride, Charlotte’s Bicycle Benefits program, a presence on social media, a library of bicycles to lend out, overnight bicycle tours…whew!

Pamela leading a CyclingSavvy Tour

Charlotte CyclingSavvy Instructor Invites You!

Pamela invites you to come to Charlotte, take the course and improve your bicycling experience. Scholarships are available. She has a WarmShowers room and a bicycle for you to use. You just need to get to Charlotte and have the time…

Nobody expects a bicyclist to go uphill at 20mph

Motorists don’t always have the best judgment about how much clear distance they need to pass a bicyclist. If anything, they expect to be able to pass in a very short distance, especially on a hill. Nobody expects a bicyclist to ride uphill at 20mph. Yet ebike riders can do that easily!

In this video let’s look at how much extra distance is required to make a safe pass, and how an ebike rider takes charge to balance courtesy and safety.

Control & Release is one of our signature strategies for finding the balance between controlling travel lanes for protection and facilitating passes when it is safe and appropriate.

We release because we control.

Many bicyclists ride as close to the edge as possible on narrow roads.

If you’re reading this, you probably already know the problems with that. Sometimes it’s safe and makes sense to move momentarily to the edge in order to facilitate a pass.

But riding there by default subjects a bicyclist to edge hazards. The faster you ride, the faster the edge hazards come toward you.

Riding on the edge also subjects you to high-speed passing that can be too close, as well as motorists passing into oncoming traffic and then swerving back into you. You’re leaving your safety in the hands of strangers. When you keep usable pavement to your right, you have someplace to go if someone gets too close.

The gift of lane control.

Even better, when you ride farther left, you have a way to positively communicate your cooperation with overtaking motorists. Sonoma County Bicycle Coalition’s David Levinger described this beautifully:

“I believe in gift-giving as a way of relationship-building. If I don’t ride farther to the left, then I don’t have anything to give.”

“I believe in gift-giving as a way of relationship-building. If I don’t ride further to the left, then I don’t have anything to give.

“But if I ride further to the left, and I wave, and I move to the right, then I’m giving a gift to this person.

“If I were riding on the right stripe, I would just be an a__hole.”

Hills hide hazards.

We control because we recognize the likelihood of unseen hazards ahead. The video below shows a hill so steep you can’t see oncoming vehicles until you reach the crest. The last 200 feet are more than a 12% grade. Even with pedal assist, I was working to maintain 15mph in the steepest part. My car struggles on this hill!

On a previous ride up this hill, I did not take an assertive enough stance and a motorist passed me within 100 feet of the crest. A car came over the top as the passer was beside me.

Luckily, I had a driveway to duck into. I won’t leave it up to a motorist to make the right decision again.

It’s not just the top of a hill that hides oncoming vehicles. A dip or flat spot can also obscure potential hazards from the line of sight.

This can be especially deceiving if the road above the dip is empty. That scenario appears in the video at the top of this post.

photo of a hill with a deceiving flat spot that hides oncoming vehicles.

You’re not only protecting yourself.

The most common hazard for an overtaking driver is an oncoming vehicle. A bad pass puts both motorists at risk of a head-on collision. There could also be an oncoming bicyclist.

One time I crested a hill and saw a woman pushing a stroller in the oncoming lane. I was holding back a truck from passing at the time.

More time and distance are required to pass a faster bicyclist.

The graph below is simplified to show how much longer an overtaking vehicle would need to be in the oncoming lane based on a Class 1 or 2 ebike speed, vs. a typical speed for a bicyclist climbing an 8-10 percent grade.

graph showing increased passing distance needed to pass an ebike rider
The law requires an overtaking vehicle to be back in the lane with an additional 200 ft of clear distance.

Motorists expect bicyclists to be slow.

A slow bicyclist can be passed with minimal time in the oncoming lane. Even so, a legal pass should allow for additional sight distance. No bicyclist should be passed near the crest of a hill.

illustration: sight distance from the crest of the hill to pass a bicyclist at normal climbing speed
Sight distance needed to pass a regular bicyclist climbing a hill.

An ebike rider at maximum assist or full throttle will be much farther down the hill when it becomes unsafe to initiate a pass.

illustration: sight distance from the crest of the hill to pass a bicyclist at ebike climbing speed
Sight distance needed to pass a bicyclist at Class 1 & 2 ebike speed.

An approaching motorist is unlikely to assess the speed of a bicyclist ahead. It will simply register as a bike—a thing to be passed.

This is why ebike riders need to be proactive with more control and communication.

The culture of speed could use some remediation.

It’s also why we need to be training motor vehicle drivers to fully assess the situation before passing a bicyclist. The notion that bicyclists are always slow was never true, but it is even less so now. And you know, the whole car-centric culture of speed could use some remediation, too.

There are a few essential tools for
Control & Release

Communication is our most powerful tool.

Bicyclists communicate with lane position and hand signals. Lane position does most of the work for sensible motorists.

Passive Control. This is the default position, between the right tire track and the center of the lane. It communicates to a motorist that he cannot pass at will within the same lane and will need to use part of the oncoming lane to pass.

Passive Discouragement. Moving closer to the lane line discourages a motorist from initiating a pass.

Active Discouragement. Maintaining that left-side position and adding a hand signal does two things: It confirms you do not want the motorist to pass, and it acknowledges that you knows he is back there. This is both instructive and humanizing.

Passive Release. Moving to the right (not the edge) sends an intuitive message that you are releasing the lane. You can also stop pedaling, which is both communication, and a way to slow and decrease the distance needed to pass.

Active Encouragement. This isn’t always necessary or appropriate, but if it is clear ahead and that clear distance is time-sensitive, a little come-around signal communicates intent to cooperate and can reduce hesitation.

Reward. Share some love! A friendly wave will thank the motorist who safely passed you. It feels good to be thanked, even if they’re being thanked for something they are required to do (pass safely).

Learn more about communication in the Mastery Course.

When control fails. If an emphatic hand signal and assertive lane position fail to stop an impetuous motorist, your best move is to reduce speed rapidly and move to the right. If a car comes out of the blind spot, you need to be out of the way.

A mirror is useful.

Over the decades, I have ridden many miles with and without a mirror.

I find a mirror to be essential equipment on 2-lane roads. It lets me know when a vehicle is approaching at a distance. I can look ahead and determine what the sight lines call for. I could move to the right and slow so the motorist can pass well ahead of a blind hill or curve. Or I might hold my position and signal the motorist to stay back until there is enough sight distance, or a place for me to move aside (like a clear shoulder).

I used a mirror but did not rely on it as much when I rode in an urban environment. Now that 90 percent of my travel is on narrow rural roads, I would not want to be without it.

This is a dance you lead.

It’s an epiphany to realize that we bicyclists have control of our environment. Our control comes from communicating and being predictable.

There are certainly easier places to ride than on rural two-lane roads. But if these roads are where you ride, then Control & Release is the dance you get to lead.

About the camera rig.

The camera is a Garmin VIRB 360 (out of production), a single camera that shoots in all directions. There is a downside to that: the resolution of cropped views is marginal.

To include the bicyclist in the front frame, the camera is mounted on a painter’s pole with a screw-on camera mount. I used musician’s drum clamps and foam pipe insulation to mount the pole to the bike frame.

The ride is a Pedego Boomerang Class 2 ebike with torque-sensing hub drive.

Bicycling in Winter Road Conditions

I live in Westbrook, Maine, a suburb of Portland. We had a few winter storms here last month.

Navigating with my non-studded hybrid tires under winter road conditions always makes me grateful to have a Savvy Cyclist’s confidence to choose the roads and the position on those roads that works best when there is ice and slush. The choices are not always the same ones I make in good weather.

This is not a general introduction to winter cycling. To place this article in context, here are some related articles that you may also wish to check out:

Winter Road Conditions

When I set out in messy winter weather, the first challenge starts at the end of my driveway. (I don’t count the driveway itself as a challenge because I can always walk my bike down it. Bonus: You don’t have to shovel the driveway to just get your bike out!)

The streets in my neighborhood looked like the photo at the right as I started out to the grocery store one night in late January.

A residential street under winter road conditions

To the extent that any part of this street can be described as clean, it is the car tire tracks. Even in warm, dry weather, the travel lane is usually cleaner than the edge of the road, or the bike lane if there is one. This is because car tires tend to sweep things aside, making the travel lane somewhat “self cleaning”. Under winter road conditions, frequent car traffic has a similar effect. It’s not so much sweeping, unless the snow is really dry. But car tires compress wet snow into slush, and may partially throw it off to the side. They may melt it if the temperature is near or above freezing. This leads to the somewhat “clearer” tire tracks you see here.

Choosing a Route

After I’m on the street, I must next choose what route to take to my destination. It’s always much nicer to bicycle on quiet residential streets, right? Well, except in this weather, all of those streets are going to look just like the one above. Although the tire tracks are better than the middle or edges, they are still usually a bit slippery. The occasional pavement hazards like cracks and potholes increase the risk. Slush may even hide them! All in all, riding under these conditions is annoying, and you often have to go very slowly.

Arterial road in winter

“Fortunately”, arterial roads are usually in better shape! The faster and more frequent traffic helps to clean them up faster, even with the same amount of plowing. (And even if it seems unfair, they usually get more frequent plowing too.) Here’s the 35 MPH arterial street I took to the grocery store that night. It still had snow in the middle and at the edge, but the tire tracks were mostly just wet, and it was much easier to see potholes and cracks. It was much less slippery than the smaller streets.

So here’s a reason you might actually choose an arterial! (And there are more.)

Winter Road Position

In both photos so far, you can see that the tire tracks are the cleanest position. There was no clear space at all at the edge. Of course some roads have wider shoulders or bike lanes. Plow truck drivers do usually make a decent attempt to clear shoulders and striped bike lanes, at least around here. Separated lanes are another story, because they require special equipment. Some cities are better than others in this regard. Around here, it’s not very reliable. Here’s what Portland’s parking-separated bike lane looked like recently. Also consider that separated lanes don’t get the car tire cleaning effect, and often don’t get as much direct sunlight to help with melting.

Bike Lanes and Shoulders

Even shoulders and traditional bike lanes are not necessarily reliable soon after a storm, evidenced by these sections I encountered while biking home a few days after one of last month’s storms.

This is a shoulder.
This is a bike lane.

So, even with a shoulder or bike lane, I sometimes had to ride in the travel lane, even if just briefly to pass icy edge obstructions.

Even within the travel lane, you may find a need to maneuver to a different position. The collector street (below left) presented such a situation about two days after the storm. As poor drainage pooled, melting snow refroze overnight.

Part of travel lane iced up
Ice covering entire right-hand lane of two-lane street

Sometimes, you just can’t avoid traveling over a small (hopefully) patch of ice, such as this driveway (above right) leading out of a doughnut shop on my way to work.

I’ve found that I can make it through such small sections of ice, even without studs, by just coasting without pedaling, being careful to keep the front wheel straight. If you are paying enough attention to see an ice patch ahead of time, you may also be able to stop, dismount, and walk it.

The Takeaway

As you can see, riding under winter road conditions requires constant awareness of the road surface, and the ability to adjust your position accordingly. A saving grace of riding during or just after a winter storm is that often there are fewer other people on the road, especially at night, and they are often more careful around you (in my experience). As always, communication with others is valuable. A more assertive lane position makes you more relevant to those around you, and in these road situations, gives you more maneuvering room to adjust your position as the condition of the road surface varies.

With these skills that we emphasize in CyclingSavvy, even cycling in winter road conditions can be fairly low-stress. Not everyone would call in enjoyable, especially given that it’s also cold, but with some attitudinal and clothing preparation, it can provide a great sense of accomplishment and independence!

John has ridden for transportation year-round in the Portland, Maine area for over 20 years.

bike downhill grade sign

High Speed Bicycling

high speed bicycling - who goes fast illustration
Athleticism is not the only factor in bicyclist speed.

The faster you go, the faster you can get into trouble.

The biggest challenge for bicycling education is that people don’t think they need it. Most untrained bicyclists unknowingly expose themselves to crash risk. While slow-speed bicycling is remarkably forgiving, high-speed bicycling is much less so. Here’s why…

Time to Cognition

time to cognition image

The generally understood time it takes to react to a hazard (known as perception and recognition time) is 2.5 seconds. When considering crash avoidance, we translate that time into distance traveled. This doesn’t include the additional distance needed to bring a vehicle to a stop. We’ll come back to that.

Two and a half seconds doesn’t seem like much, but what does it mean in terms of distance?

Speed in Miles/HourSpeed in Feet/SecondDistance Traveled in 2.5 Seconds
10 mph14.7 fps37 feet
20 mph29.3 fps73 feet
25 mph36.7 fps92 feet

Class 1 & 2 ebikes have an assisted top speed of 20 mph. Class 3 ebikes have an assisted top speed of 28 mph. Athletes frequently achieve these speeds as well. An average rider on any bicycle can go faster downhill or with a strong tailwind.

Stopping distance

Once the hazard is recognized, the emergency maneuver begins. Depending on the circumstance, a swerve or snap turn might be the chosen avoidance maneuver.

Or you might brake. If a full stop is required, the distance needed varies dramatically with vehicle weight, equipment type and condition, surface conditions, incline or decline of the road, and rider skill. The diagram below assumes a level, paved surface and appropriate, properly-maintained brakes.

stopping distance by bicyclist speed graph
(Click the image to enlarge.) A bicyclist trained in emergency braking can stop in a much shorter distance than an unskilled bicyclist who fears the front brake. Taking a bike-handling class will shorten your braking distance.

You have to see it to react to it!

A longer stopping distance means a faster bicyclist needs a longer line of sight (known as stopping sight distance) to a potential conflict. How far can you see around a curve or over the crest of a hill? Can you see cars preparing to enter the road at a driveway or intersection? Are there obstructions such as poles, trees, fences, or parked cars? Can you see cars waiting to turn left ahead of you? This is the kind of situational awareness that keeps you safe.

See and be seen

Changing your position on the road can allow you to see potential hazards from a greater distance. It also makes you more visible to other road users.

line of sight illustration
Adjusting your position in the lane can increase your stopping sight distance while allowing you to maintain speed.

Motorists misjudge speed

While it’s always good to maximize your visibility, being seen isn’t a fail-safe. Motorists often see bicyclists and pull in front of them anyway because they underestimate their speed. This is even more likely with an upright ebike and rider in street clothes. This makes it extra important that you have a clear line of sight to motor vehicles. Knowing where to look will give you a jump on that reaction time! Learn more about how to counter motorist errors in the CyclingSavvy Basics Course.

When they come from behind

Bicycling at higher speed reduces the speed differential with overtaking motorists. This reduces closing speed, but also creates a longer overtaking distance when they pass. Oh, they must pass the bicyclist.

stay back hand signal illustration

Passing motorists frequently misjudge speed and the distance needed to clear a slower bicyclist. The faster you go, the more likely they will misjudge the distance they will need to pass. It’s common for drivers to attempt to pass into a blind curve, or within a 100 feet of a stop sign. Some will do this even when you are traveling the speed limit! Don’t be afraid to put your arm out to discourage an unsafe pass. Learn control & release and powerful communication techniques in the CyclingSavvy Mastery Course.

Increased overtaking distance has implications for right hook crashes, as well. The faster you are traveling, the farther from the intersection a motorist will initiate a pass, thinking there is time. And then forget about you while you’re in his blindspot. Check out this windshield view video of a motorist passing a bicyclist on a class 1 ebike.

Don’t count on turn signals, mirrors or on the side-view cameras on some newer cars. Watch a car that is passing you to look for signs that it is slowing before a possible turn.

Implications for parallel bike facilities and high-speed bicycling

It’s fair to say that sidewalks, many side paths and bike lanes have stopping sight distances well below ebike speeds. If you can’t move left, the only way to improve your stopping sight distance is to reduce your speed.

It only takes one person to prevent a crash

It doesn’t matter who is at fault, you would rather not crash. Because of the increased stopping distance and likelihood of motorists misjudging your speed, there is an increased burden on a fast bicyclist to learn defensive practices and anticipate other people’s errors.

Our next ebike post will look at the benefits and risks of assisted acceleration.


Do you own a Pedego bicycle? Visit your Pedego Dealer for a free membership code. Pedego owners get the CyclingSavvy Basics Course and access to live member sessions, made possible by a sponsorship from Pedego Electric Bicycles.

Bidgee, CC BY 3.0 , via Wikimedia Commons

Does a Stop Sign Just Mean “Stop”?

A stop sign just means “stop.” Or does it?

Children can’t muster the attention to address subtleties, and so parents and teachers drill them in simple rules. So, just “stop.” Or “stop, and look both ways.”

With time and experience, though, all but the most stiff-necked among us place rules in some perspective.

We don't just obey the traffic law: we make it work for us

Testing the rules — flouting the rules — can be a phase of growth in adolescence. With CyclingSavvy, we go beyond that, and “beyond” means that we don’t just obey the traffic law, we make it work for us.

Now let’s apply that idea to stop signs.

Stop, and yield

A stop sign law doesn’t just say “stop.” Stopping is only the first action a stop sign requires — not the most important or most demanding action either.

That action is yielding. Yielding prevents collisions. A building, vegetation, parked car, etc., may hide traffic in a cross street, so pulling forward and blocking the crosswalk may be necessary. It may, then, be necessary to yield more than once.

No driver can claim “right of way”. That claim is upside down, because you can start out, then find that you have to yield. The rules of movement are about cooperation, not entitlement.

Bristol Street at Webster Avenue, Cambridge, Massachusetts, USA, May 29, 2018

How many times might it be necessary to yield at the little intersection in the photo? Hint: all vehicles are parked except the gray one moving right to left.

Three times — before the crosswalk if another pedestrian is stepping into it; again, on entering the street, and once more when able to peek around the gray SUV illegally parked on the right corner.

If sight lines are very poor, it may even be necessary to inch out slowly into the cross street, requiring traffic in that street to yield. And if there is another vehicle behind you, you can’t back up. Not so simple…

Stickler for stopping?

Customs vary, and police may or may not be sticklers for the letter of the law about stop signs. In Massachusetts, where I live, hardly anyone comes to a full stop except to pass a driver’s licensing exam, unless necessary to yield.

It is especially inconvenient for a bicyclist to stop, lose momentum, put a foot down and have to restart. So, I’m not going to be stiff-necked about full stops. It is of paramount importance though to send the message that you will yield, by at least slowing to a crawl when you haven’t reached the stop line yet. Showing that you will yield maintains respect for bicyclists, which is already in short supply.

You can be a stickler without putting a foot down! CyclingSavvy shows how to do the “balance stop”: braking to bring the bicycle’s wheels momentarily to a stop while shifting body mass forward to maintain momentum and balance. It’s legal.

Often, too, you can slow to reach an intersection at the same time as a gap in cross traffic. We practice slow riding in our course.

Stop signs and groups

It is most efficient to approach a two-way stop riding two abreast. Each side-by-side pair of bicyclists in a well-organized group checks for cross traffic before entering the intersection. At a 4-way stop, the cross traffic is also required to stop, and a group of bicyclists may move through together like a bus. This is more efficient for the cross traffic too. Every individual still should check for cross traffic.The CyclingSavvy Club Rider Essentials course describes this technique while acknowledging that it is not technically legal. It could become legal with changes in the law.

Stop signs and shared-use paths

Shared-use paths create a quandary where they cross streets. Drivers on the street must yield to pedestrians, as at any crosswalk. Yet stop signs are often posted facing the path to warn bicyclists to slow and stop. Because bicyclists are faster than pedestrians, this may be necessary so motorists can see the bicyclists in time to yield. So — two contradictory rules apply: the crosswalk requires drivers in the street to yield — but the stop sign requires bicyclists on the path to yield. All too often, bicyclists on the path and drivers in the street both yield, causing unnecessary delay and confusion.

Very often, a vehicle would have cleared the crossing before I reach it, and nobody would have had to wait if it had just kept going. But to cross safely if one driver stops, a bicyclist must wait till drivers in every lane stop. I don’t think that there is a good solution short of installing traffic signals, which are expensive and impose their own version of delay!

Paths often have stop signs even at one-lane roads and driveways where motorists will be traveling very slowly and sight lines are wide open. This overuse of stop signs leads to disrespect for them.

Stop sign overuse
Stop-sign overuse in Orlando, Florida

Stop, and then walk?

Or signs may instruct bicyclists to walk across. This may make sense for people with poor bike-handling skills. But, the safety advantage of walking with a bicycle broadside to the cross traffic is open to question, and also, for sure, it takes longer.

Stop sign and walk bikes sign on a shared-use path
“Walk across, do not ride” — some can’t be bothered to. Cape Cod Rail Trail at Underpass Road, Brewster, Massachusetts, summer 2001.

No stop sign and so, no stop?

The absence of a stop sign should not lead to the assumption that yielding is unnecessary. At an uncontrolled intersection, drivers yield to traffic coming from the right; at a T intersection, the driver coming up from the bottom of the T yields. (Why? Turning drivers must yield to through traffic, and this driver can only turn right or left.)

Sidepaths and barrier-separated bikeways often overturn the usual rules of movement, placing through-traveling bicyclists in the path of turning motorists. Signs may instruct the motorists to yield, but bicyclists must be prepared to scan for motorists coming from behind, and yield to avoid being hit.

Be prepared to yield in case a driver coming from behind doesn’t see you. Cambridge Street, Cambridge, Massachusetts, USA. Motorist’s view of the same location.

Stop-sign politics

There is a strong tendency in the USA to micromanage priority at intersections using stop signs. Political pressure leads to the installation of stop signs where yield signs would be sufficient — sight lines are clear. This can lead to a “cry wolf” situation devaluing the message of stop signs where they are really needed. It also can lead people to assume that there is no need to check for cross traffic if there is no stop sign, as in examples already given in this article.

In western mountain states, like Montana, you will find that most residential intersections have no stop signs. The default rules for yielding apply. As a bonus, motorists are conditioned actually to look for conflicting traffic as they approach intersections instead of just looking for a stop sign. The result is they are very good at seeing and yielding to pedestrians.

Could it be that unnecessary stop signs dumb down the environment and make us all less safe?

Stop-signs and the spirit of the law

The saying that we make the law work for us reminds us to create safe space in which to ride. We take actions beyond the requirements of law to make our intentions clear, and to find empty space on busy streets. And sometimes, we lightly bend the law, or expand on it, when its word is too blunt to live up to its spirit. That is often the case with stop signs.

Another CyclingSavvy saying is “don’t let the paint think for you.” We might also say: “don’t let a stop sign — or the absence of one — think for you.” As I hope that this article has made clear, the traffic law offers only a framework for behavior. Stop signs and the laws that apply to them do not remove the need for situational awareness. Simple rules may be the best we can do for schoolchildren, and for assigning fault in case of a crash. Mature behavior in the real world has to be based on respect for law — but goes beyond the requirements of law. It also accounts for mistakes other travelers may make, and it fundamentally reflects the spirit of the law, a spirit of cooperation.

flat tire

Flat Tires and Ebikes

a bicycle with a flat tire

Flat tires will happen…

Avoiding flat tires is just one more reason to avoid riding in the gutter at the edge of the road, where debris accumulates. CyclingSavvy lane-positioning strategy prevents flat tires while it improves your interactions with other road users. Is that thought new to you? Check out our online materials and course offerings!

Still, if you ride a bike, the question is not “if” but “when” a flat tire will interrupt your ride.

Repairing a flat tire on a standard bike with clincher tires and tubes is straightforward, and a just little more complicated if you are running tubeless tires.  Flats can usually be repaired with a hand pump, tire levers, and a spare tube. Detailed instructions are here.

E-bike Complications

But – if your ride is an e-bike, repairing a flat tire can get more complicated, so let’s discuss this.

Ebike mid drive
Mid-motor drive

Mid drive

A mid-drive e-bike has the motor centrally located near the cranks and pedals.   Aside from the weight of the bike and motor, repairing a flat on a mid-drive e-bike is not too difficult, because the wheels are like those on most bikes.  

Hub drive

E-bike rear-hub drive -- makes flat-tire repair difficult
Rear-hub motor drive

Not so with a hub-drive model.  A hub-drive e-bike has a very large front or rear hub that houses the drive motor (left illustration).18- to 22 mm hex nuts secure the axle. Wheels with hub-drive motors are quite heavy, so much that many bike shops which service e-bikes have powered bike stands to lift a bike off the ground.  Some e-bikes tip the scales at more than 70 pounds!  Unless you have a way to lift the bike and the large, rather heavy wrench for the large nuts that hold the wheel in place, you can’t remove the wheel to replace the inner tube.

A bike shop will always replace the inner tube, so it can guarantee its work. You might plan to walk or call Uber to get home. But wait! It is possible to lay many bikes down and patch the inner tube without removing the wheel. Instructions on exposing and reinstalling the inner tube are here. This is more cumbersome than working on a wheel you have removed from the bike, but it can fix the flat tire and get you rolling again. This trick is not practical on e-bikes with 20″ fat tires.

An ounce of prevention is worth a pound of cure, as the saying goes.

Prevention is the key

While no countermeasure is 100% effective, there are several ways to prevent flats through equipment choices and maintenance. 

Inspect Before Every Ride

I tell participants in my CyclingSavvy classes to remember the ABCs: Air, Brakes, Chain/cranks/cassette.  All tires have the tire pressure range marked on the sidewall. Do not ride if the tire pressures are below the minimum setting. Check air pressure before every ride, at least with a thumb-and-finger squeeze.

It is normal for air to seep out slowly through rubber. Top up pressure weekly with a pump that has a pressure gauge. If the tire pressure is low, the tube can bottom out on the rim, causing a pinch flat — also called a snakebite flat, because it leaves a pair of holes in the inner tube. Low pressure also can rotate the tire and tube under acceleration and rip the valve from the tube. 

Check tires for any bulges, tears, or signs of excess wear such as threads showing through the tread area.  Replace worn or damaged tires.  Many tires have wear indicators.  Replace tires when the wear indicators are no longer present.

Sealants in Inner Tubes

Tire sealants are thick liquids reinforced with solid materials that clog up a hole. Some sealants can be injected into an inner tube through the valve, or are pre‑installed in new tubes, and claim to repair holes to 3.0mm (about 1/8”).  Use only a sealant intended for use in inner tubes. We have seen positive results with sealants for very small punctures from thin glass shards and thorns. If the object that caused the puncture is still embedded in the tire, you must remove it.  If not, it will enlarge the hole in the tube with every turn of the wheel.

Tire Liners

A tire liner can prevent a flat tire
Inexpensive tire liner

Some tires have a layer of Kevlar fabric under the tread. Several companies market liners that fit between the tire and the tube. Some liners are Kevlar-reinforced, some are heavy plastic strips, while a new style of liner is made from a multi-cell foam 15mm (about 5/8”) thick in the center section.

I have seen very good results with the multi-cell foam liners.  The manufacturer claims that they prevent about 90% of flat tires.  But no tire liner will prevent a puncture from a 2” nail.  

Armour-layers insert
Multi-cell foam insert

These liners are pricey.  Installing of a multi-cell foam liner in a 20x 4.0 fatbike tire on the drive wheel can cost nearly $150.  Yet, that is about the price for repairing one flat tire on the drive wheel (parts and labor) at most shops.  So, if the liner prevented one flat tire, it has paid for itself.

“Thornproof ” inner tubes are another option, with thicker rubber under the tire tread.

Any of these options increases rolling resistance — but that is not a major issue with an e-bike.

Tubeless, flat tire resistant

Some tires and wheels can go tubeless.  Tubeless technology for mountain bikes has been around for just over 20 years.  As a mountain bike racer, I have used tubeless tires since their introduction.  In 20 years, I have only had two flats with tubeless tires, caused by a catastrophic tear in the sidewall when I ran over a partly buried section of metal fence post.

Tubeless tires are made flat-resistant with sealant.  I use a “Race” sealant that will repair holes to 7mm (about ¼”). Many sealants will seal holes to 4mm.  Most sealants dry out, so you need to top them off at least every 4-6 months; even more regularly in hotter climates.

Tires should be classified as UST (Universal Standard Tubeless) or TR (Tubeless Ready).  Rims need to be either tubeless-compliant with no spoke holes and a smooth inner rim surface, or converted to tubeless using an approved rim-sealing tape.

If a tubeless tire does get a flat, and adding sealant doesn’t work, then a tube must be installed.

In recent years, tires for general use on paved and gravel surfaces have trended wider. Research has shown them to roll as easily as narrow tires, under real-world conditions. Wider tires give a more comfortable ride, with lower air pressure, and can run tubeless. Tubeless doesn’t make sense at least yet for narrow, hard-inflated road tires: an overinflated tubeless tire is more likely to blow off the rim. — dangerous, and the sealant makes a real mess..Here’s some good general information on choices.

There are tubeless 26 x 4.0” fatbike tires and some 26” fatbike rims.  There are tubeless 20 x 4.0″ tires, but I am unaware of any wide 20” rims that can be converted to tubeless. Check with your bike shop.

One more thing…

You may want to do a roadside flat-tire repair if you have a small e-bike with 12.5″ tires and a hub drive motor. Before you do, check to see whether the drive-motor power cord can be disconnected. There is usually a connector somewhere near the drive motor. We have seen several inexpensive small and folding e-bikes that have drive motors wired directly into the battery box or control module. This complicates on-road repairs greatly and may even prevent a tire repair altogether when you need to replace the tube during a ride.

Be Prepared

ABEA welcomes e-bike riders in CyclingSavvy courses, but we don’t have the equipment to remove and replace a hub-drive e-bike wheel on the road. Please come to class with your equipment, and tires in good condition.  This applies not only to e-bikes, but for all riders. Remember the ABCs!