A modern roundabout, or is it a traffic circle?
In an earlier post on this blog, I described savvy strategies to navigate a small, single lane traffic circle. I’ll now take the discussion up a level and describe a modern roundabout. I shot the video below in Montreal, Quebec, Canada, while on a bicycle tour with a friend. The location in the video, FYI. Have a look at the video and then I’ll follow up with some comments.
Roundabout or traffic circle? Does it matter?
Articles about this intersection call it either a roundabout (rond-point) or a traffic circle (carrefour à circulation giratoire). One of the articles explains that entering traffic must yield to traffic in a roundabout; rules for a traffic circle are the opposite: antiquated French practice. At every circular intersection I have seen in the US or Canada, entering traffic yields, for a good reason which I’ll explain later. Here, signs tell drivers to yield at crosswalks and again when entering the circular roadway. So, I’ll call this a roundabout, though in some ways it doesn’t quite operate as one.
Modern roundabout advantages and disadvantages
Modern roundabouts have deflection – curved entrances and exits. Also, there is a truck apron — a ring of raised pavement inboard of the circular roadway. When a large truck is in the inner lane, its left rear wheel(s) go up onto the the truck apron. These features slow traffic down. There is more time for drivers to negotiate right of way, reducing crash severity. There are no head-on conflicts. And, because traffic in the circular roadway never stops, a roundabout can carry more traffic than an intersection with traffic signals.
Roundabout advocates like to stress these advantages, but there are also some real problems. Unless drivers reliably yield at crosswalks, pedestrians have a harder time at roundabouts than at signalized intersections. Because traffic flows continuously, gaps in traffic downstream of the roundabout are fewer. Drivers in side streets have a harder time entering or crossing downstream traffic.
In a two-lane modern roundabout, drivers are supposed to yield to traffic in both lanes and go directly to the inner lane except when taking the first exit. Drivers must cross the outer lane when exiting from the inner lane. These issues have led to quite a bit of confusion and to increases in crash rates. As noted in the video, one leg of this roundabout has been restriped from two lanes to one — probably reflecting this concern.
A mostly modern roundabout Quebec-style
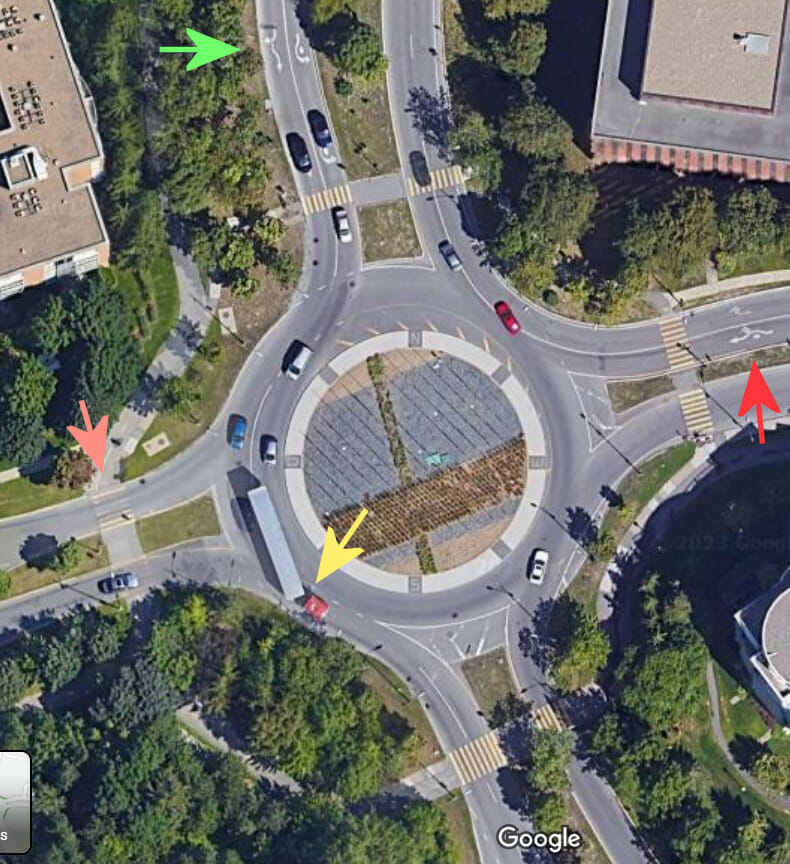
In the satellite view below, the orange arrow at the left shows where I began my tour of the roundabout. The green and red arrows point to markings that tell drivers which lane to use at two-lane entrances. Lane use is different at these two entrances, reflecting the volume of traffic which takes different exits.
It is unusual for both lanes of a two-lane entry, like the one with the red arrow, to allow right turns. Though drivers are not supposed to change lanes or overtake inside a modern roundabout, a red car is doing that anyway. The yellow arrow points to an example why they shouldn’t overtake: the truck’s cab is in the outer lane, but the trailer is off-tracking into the inner lane. A driver who tried to overtake would get a big squeeze. If the truck had entered from the north, it would first have off-tracked to the right. You can actually see where trucks have gone up over the curb.
Do you see inconsistencies with standard US roundabout rules? I see two! Explanations are below the picture.
The inconsistencies:
- If the truck (or any other vehicle) entered from the east (red arrow), it would have to change lanes to get to the southbound exit.
- The section with the dashed line at the head of the yellow arrow also extends back under the truck. It is long enough that drivers entering from the west (left side of the image) will be merging across this segment rather than yielding to traffic in both lanes at once.
And for bicyclists and pedestrians..
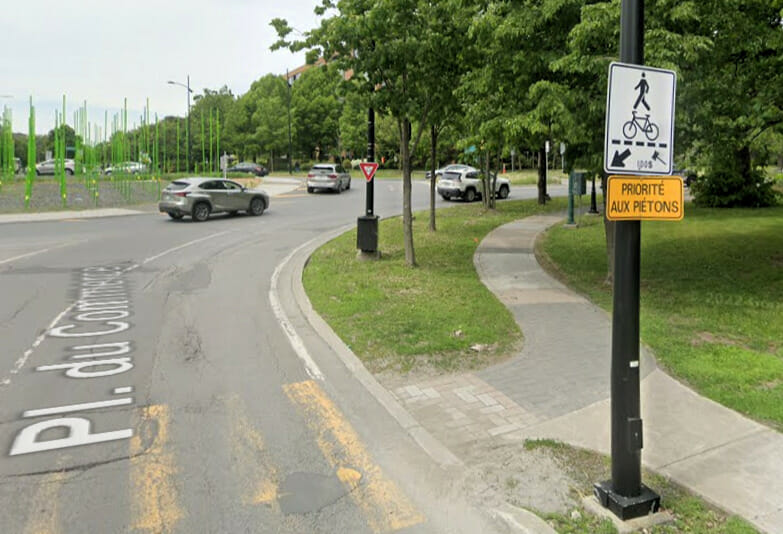
Something different, the video shows… Quebec is very intent on separating bicyclists from motor traffic. Bicyclists are directed to ride around the outside of this roundabout, using crosswalks along with pedestrians.
Motorists’ yielding to heavy bicycle and pedestrian traffic in crosswalks overturns the advantage of a roundabout in increasing capacity for motorists. And safety issues with the sidepath treatment are debatable, as most crashes occur at intersections and driveways, where bicyclists and motorists do not have a good view of each other. Motorists are supposed to yield to bicyclists, but for safety’s sake, bicyclists also most be prepared to yield. Mighk Wilson’s summary of his research, published in this blog, highlights such issues. His key finding was that bicyclists make the bikeways safer — by riding slower — rather than that the bikeways make the bicyclists safer. Safety at speed becomes an increasing concern with the advent of ebikes.
One side, two-way
A two-way sidepath runs along one side of each street that connects to this roundabout. The sidepath runs only 3/4 of the way around the roundabout — and so, to connect with the streets going in all four directions, the sidepath is two-way. The fourth quadrant has only a narrow sidewalk.
Mighk Wilson, among others, has shown that entering a crosswalk from the right is generally much more hazardous for a bicyclist than entering from the left: right-turning drivers will be looking left. In this modern roundabout, crosswalks are well back from the circular roadway. Motorists’ attention does not have to be directed toward roadway traffic when scanning for bicyclists. But still — bicyclists need to be prepared to yield.
I explore the roundabout
While my companion checked out a map, I first rode the sidepath. Fortunately, traffic was light. A motorist was approaching at only one crosswalk, and yielded to me.
The route around the outside of the roundabout on the sidepath is long, and slow. For purposes of comparison, I also rode around in the roadway.
The same strategies demonstrated in the earlier post about traffic circles apply in this modern roundabout. Except when preparing to exit, I kept to the inside, where there are no entrances or exits and motor traffic is slow. My strategy worked fine, and I decided to take a second tour around the roundabout. Riding the roadway is my usual choice, and at many circular intersections, it is the only option.
Bend the rules in a modern roundabout?
Really, the savvy approach to roadway riding is the same in an old-style traffic circle or a modern roundabout: use the correct lane, and especially, get away from the outside if you are going past the first exit. Be careful of entering traffic when you are exiting, especially at a two-lane exit. I sometimes do find it useful to bend the rules and merge toward the outside lane before I exit, to avoid conflict with traffic coming around in the outside lane — explanation here.
The video reveals that two quadrants of the roundabout were originally two-lane, and entering drivers would have to yield to traffic in both lanes. One quadrant still is two-lane, under the semi truck in the image above. Striping a gore (no-drive zone) next to the center island in the other quadrant reduced it to one lane, at least in theory – you’ll notice that the paint is worn. I rode over the gore myself. Bad me. But I avoided a potential conflict with an entering vehicle!
What do you think?
Expect another article soon, taking the exploration of circular intersections to yet another level…