A Beginner’s Guide, Part One: Bicycle Safe to Ride?
Usually, in Maine, few bicyclists are out on the road in early April. But this year, I saw many. All over the world, bicycle use was on the rise as people cut back on social gatherings, and public-health experts encouraged outdoor exercise. Old bikes were being dusted off. Bike shops — with their shiny new status as essential services — couldn’t keep up with demand.
The sign offered basic mechanical assistance such as changing an inner tube or adjusting brakes, and safety advice. I also started a companion blog. The idea was to help beginners, if I could. I didn’t get a lot of patronage, but I did successfully learn to replace a rear shifter!
A Unified Theory…
My goal with the blog was to cover the basics. By late August, I felt I had done that. I wanted a way to tie it all together, a well-organized “Grand Unified Theory of Bike Safety.” So, in a late-August post, I presented a concept called the “Five Layers of Bicycle Safety“, developed by friend of CyclingSavvy Dan Gutierrez. I have also been influenced by a different categorization used by our Bicycle Coalition of Maine in its youth education program .
This series of posts will attempt a similar unifying treatment, using top-level categories of:
- Equipment
- Clothing
- Skills
- Behavior
As with the “Five Layers”, I present these in this order because each builds on the last. Each level of safety requires the prior ones. You might think of them also as being in the order in which a beginner cyclist should tackle them.
Let’s start with equipment. Is that old bike safe to ride?
The Bicycle
The two main safety questions to ask about a bicycle are (1) does it fit you, and (2) is it mechanically safe to ride?
Bike Fit
You can go all out with a professional fitting session at your local bike shop. But even a beginner can roughly evaluate whether a bicycle fits.
Handlebar position
Elbows should bend slightly without your having to reach for the handlebars or slide forward on the saddle. The distance to the handgrips depends on the length of the frame, but also on the design of the handlebars and handlebar stem. These are replaceable.
Generally, a person who rides harder will want the handlebars lower so that the weight of the upper body counteracts the force on the pedals. But then the neck and shoulder muscles need strengthening to hold the head up, and so beginners generally prefer higher handlebars. Handlebars never have to be higher than the waist.
Stand-over Height
Stand in front of the saddle, straddling the frame, with your feet flat on the ground. If the bicycle has a horizontal top tube, it should be 1-2″ below your crotch. If the top tube is slanted down to the seat tube, you can still try to imagine what the distance would be if there were a top tube.
Cyclist standing over a bicycle with a slanted top tube. A mountain bike with a slanted top tube favors dismounts on uneven ground.
Cyclist lifting the bicycle to check stand-over clearance. A bicycle with a horizontal top tube should clear by at least an inch.
Typically, the seatpost will protrude about four inches above a horizontal top tube. A somewhat smaller frame is OK, with a longer seatpost. A somewhat taller frame is OK, too, if the top tube is slanted. The reach to the handlebars is more important.
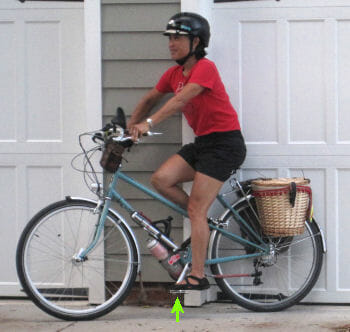
A smaller cyclist (for example, 5’0″ CyclingSavvy Instructor Pamela Murray, pictured below) needs a bicycle with somewhat smaller wheels than usual to maintain the correct geometry.
Leg Extension
While pedaling, your legs should not go completely straight at the bottom of the pedal stroke, but should be just slightly bent. Neither should your knees rise above your waist at the top of the pedal stroke. Riding a with a low saddle will tire you out and wear out your knees.
If leg extension is not quite right, the saddle may be moved up or down to compensate. Be aware, however, that most bicycles are not designed to allow the rider to sit on the saddle with the feet flat on the ground. A saddle that low doesn’t give you enough leg extension. When sitting on a properly adjusted saddle, you will at most be able to touch your tiptoes to the ground. (But this is not necessary when riding! See our post on starting and stopping.)
Your knees will be slightly bent at the bottom of the pedal stroke. If the saddle is too high, you will be “reaching” for the pedals and your hips will rock — stressful!
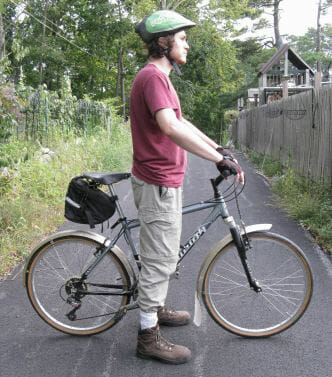
On a bicycle that fits, the knee is slightly bent at the bottom of the pedal stroke, with the pedal under the ball of the foot. Arms are more relaxed.

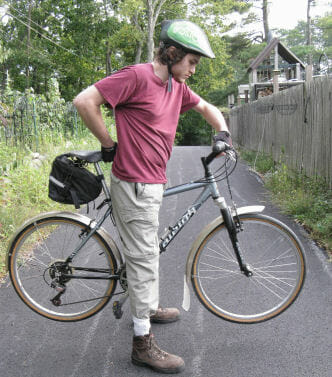
The bicycle is slightly too large. The ankle is slightly raised, the knee is straight. Arms are outstretched. The pedal is forward on the foot (green arrow).
Before raising the saddle, take the seatpost out all the way to check that it is long enough when adjusted to fit you. At least 2 1/2 inches should remain inside the frame.
If saddle adjustment still does not create the proper fit, you may need a different bike with a different size frame, or maybe only a longer seatpost, if the handlebar is high enough.
Level Saddle Forward-Back Adjustment
The saddle can also slide forward and backward, and can tilt, after loosening the bolt(s) in the seatpost clamp underneath it. The saddle should be level. You will feel whether it is too far forward or backward as you pedal. (You will want to sit farther back than it allows, or slide forward.)
REI has good detailed information on bike fit.
Safe to Ride?
For evaluating a bike’s mechanical soundness, many education programs use the “ABC Quick Check.”
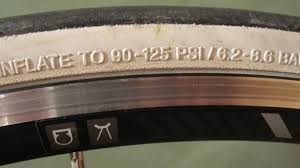
Air
Under-inflated tires can affect bike control, and harm the rim. Check to see that the tires are properly inflated.
It’s best to inflate tires with a bicycle pump with a built-in pressure gauge, or have a separate gauge. A pressure rating will be printed somewhere on the tire, measured in “PSI,” Pounds per Square Inch. This is a maximum pressure. You will have a more comfortable ride with a somewhat lower pressure, especially if you are light. Generally, wider tires that operate at lower pressures give a smoother ride.
Bicycle inner tubes have two common types of valves, “Schrader” (same as on motor vehicles) and “Presta” (skinnier). Some pumps handle only one or the other, some both. I go into more detail about valves and how to use the pump in my “A is for Air” FreeBikeHelp post.
Swapping Inner Tubes
Schrader valve w/o valve cap
Presta valve, closed. Unscrew nut to open.
If you ride a lot, consider learning to swap out an inner tube yourself, to avoid being stranded. To do this, you will need a set of “tire levers” (to help pry the tire off the rim), a portable pump, and a spare tube of the appropriate size.
On a bicycle with quick-release wheels, swapping the tube is simpler and faster than repairing it, if the hole is even patchable. If so, you can patch the inner tube when you get home and use it as a spare. If the bicycle has an internal-gear hub and/or coaster brake, it may be easier to expose and patch the tube without removing the wheel.
Many bike shops offer classes on how to change an inner tube, or you can learn online. Detailed instructions are at https://sheldonbrown.com/flats.html. One important step in changing a flat on the road is to examine the tire for what caused it. You don’t want to have your new spare go flat five minutes later!
Brakes
Most adult bikes and older kids’ bikes have handbrakes, operated by levers on the handlebars. To check these, lean over the bike, pressing your belly down on the saddle, apply one brake at a time and try to push the bike forward. The brake should engage before the lever has traveled far. When you grip the lever as strongly as you can, the lever should be no closer than about a half inch from the handlebar. The brake should firmly stop the wheel from turning.
If your brakes operate by squeezing the rim between a pair of brake pads, check for brake-pad wear. Cable-operated brakes have a bolt-like adjuster either at the lever or at the brake. As the pads wear, you unscrew this (and retighten its locknut) to keep the lever travel in the correct range. When pads wear down to where there is 1/8 inch of rubber clear of the backing plates, replace them. Also change pads if the rubber has hardened. Disk and drum brakes have the same kind of adjusters, though the mechanism is different.
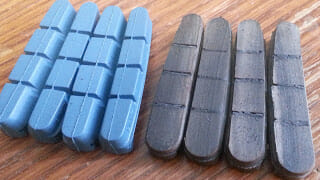
new (left) and worn (right) brake pads
Very small kids’ bikes, and some other bikes, have a coaster brake, a.k.a. “backpedaling brake”. To test this, press back on a pedal and make sure that the brake stops the rear wheel.
If your brakes do not perform well, or make noise, they may need more complicated adjustments, or replacement. Check with your local bike shop.
Chain/Cassette/Crank
The letter C stands for any or all of these. They are all parts of the bike’s drivetrain, which makes it go when you pedal. The cassette is the name for the cluster of sprockets on the back wheel. The cranks are the levers that hold the pedals.
The basic check here is to make sure that the chain and sprockets are clean, lubricated, and move smoothly and quietly. Pedaling backwards should not result in the chain skipping around. Gear shifting should be smooth.
Use chain lubricant from a bike shop, or oil from a hardware store. Do not use WD-40. It is a de-greaser, and will actually remove other lubrication.
After you look at the chain and cassette, wiggle the cranks to make sure they’re not loose side-to-side. The only movement should be circular.
Addressing problems with anything here beyond cleaning and lubrication will typically require repair from a bike shop, or a capable shade-tree mechanic.
Quick Releases
A quick release is a lever-operated clamping mechanism with an adjusting nut on the side of the wheel opposite the lever. Pressing the lever toward the wheel secures it. The lever should be tight enough to leave a slight impression on the palm of your hand, but should still close all the way. A quick-release may also secure the seatpost. If these instructions confuse you, go to sheldonbrown.com for more detail. It’s important for your wheels to be secure!
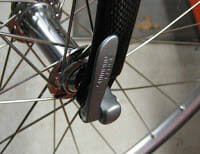
A quick release on a wheel
Safe to Ride. Next…
Now your bike is safe to ride! In the next post in this series, we’ll discuss lights and other safely-related equipment.


Very good stuff John (B)!
To add to the ABCs for e-Bikes…
The normal ABCs, there is an added “E” for E-Bikes.
“E” Is for Electronics: Check on-board computer, ride/assist mode switch, battery, motor, speed sensor, connections, etc.
Check the “Es” to ensure they are properly and securely attached, not damaged in anyway, and working properly. Batteries should be charged in advance of rides. Check the E-Bike owner’s manual on how to properly charge, store, and transport the battery. Overcharging the battery could damage it. Always recycle old batteries properly through eco-friendly recycling sources.
IMPORTANT NOTE: Always carefully remove the battery when performing non-electronic, normal maintenance on the E-Bike – this will eliminate any accidental motor engagements. Avoid dropping, crushing, or puncturing your E-Bike’s battery, as it could damage it beyond repair or cause an explosion! Do NOT open the battery – leave it to the experts.
CS⚡
Thanks, Clint! I hadn’t heard of the “E” yet! (At least for equipment safety. Of course you probably already know of the proliferation of E’s for infrastructure planning: Engineering, Education, Enforcement, Equality…)
But if we’re going to E, we should have a D first! What would that be? ;-)
You’re welcome John!
Yes; The “E” for Enforcement is under threat and has been removed by Safe Routes Partnership.
Currently, this is the HOT online topic with CABO (California Assoc. Bicycle Organization).
A Zoom meeting by Safe Routes Partnership, on their dropping “Enforcement” from the “Es,” is scheduled for next month.
Clint, can you elaborate on the reasons being put forward to eliminate Enforcement?
Good morning John!
SRP’s Zoom meeting is this Thursday. I can more informatively advise on their position and why, after the meeting.
As I spoke to their Executive Director for 45 minutes recently, they have already decided to remove “Enforcement” from their 6 “Es” and will NOT change their view!
So sad, the League decided to do the same thing!
Hi John. Hi Pam. Minor “nit”. Pamela Murray’s bicycle in the 1st image might not be too large. Just her seatpost might be set too high.
Looks to me like that might be true. I’ll defer to my editor, John Allen, since he was the one who added those pictures. :-)
Oh, I know that bike. Pam showed up with it at the 2015 I Am Traffic conference. The bike is her daughter’s. Pam was using it because hers wasn’t available. I have suggested that a plain-tube seatpost with the saddle clamp upside down might allow lowering the saddle more (trick suggested by the late, great Sheldon Brown), but I don’t know whether Pam has tried this trick yet.